All On Four Dental Implants Before And After
Deciding to restore your smile is a big step. If you have missing teeth or loose dentures that click and slide, you have probably heard about All On Four dental implants. This treatment promises a full set of fixed teeth in just one day.
But what does the journey really look like? Many websites show perfect smiles and happy patients. However, you deserve the full picture. You need to know what happens before the surgery, how you will feel after, and what life looks like five years later.
In this guide, we will walk through the realistic All On Four dental implants before and after experience. No false promises. No unrealistic Hollywood magic. Just honest, practical information to help you decide if this treatment is right for you.
Let us start from the beginning.
What Exactly Are All On Four Dental Implants?
Before we look at the transformation, we need to understand the technology.
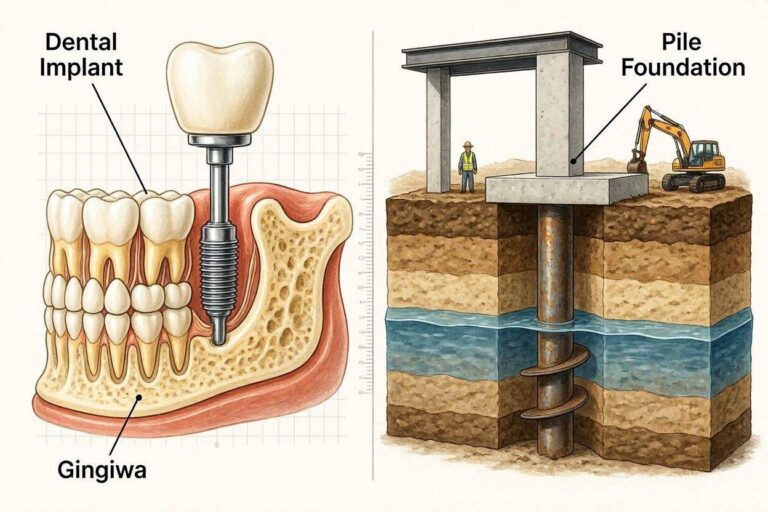
All On Four is a specific technique for replacing all teeth in one jaw (upper or lower). The name tells you exactly what it is:
- All – All of your teeth are replaced.
- On – The new teeth are supported by implants.
- Four – Only four dental implants per jaw.
The magic of this system lies in the angles. The two back implants are placed at a 30 to 45-degree angle. This angled placement allows the surgeon to use longer implants. It also avoids areas where bone is weak, such as the maxillary sinuses in the upper jaw or the nerve canal in the lower jaw.
Important note: All On Four is not the same as getting six or eight individual implants. It is a specific protocol designed for patients with moderate bone loss who might not qualify for traditional implants without bone grafting.
Who Is A Good Candidate?
You might be a candidate if you:
- Have lost most or all of your teeth in one jaw.
- Wear traditional dentures that are uncomfortable.
- Have been told you have “low bone density.”
- Do not want to wait 6 to 12 months for bone grafting.
- Are in good general health (no uncontrolled diabetes or autoimmune diseases).
You are not a good candidate if you:
- Have active gum disease (this must be treated first).
- Grind your teeth severely at night (bruxism).
- Are a heavy smoker (smoking dramatically increases failure rates).
- Have very poor bone quality that even angled implants cannot bypass.
The “Before” Phase: What To Expect
The “before” stage is more than just looking in the mirror. It involves planning, appointments, and emotional preparation.
Initial Consultation And Imaging
Your journey begins with a consultation. The dentist will examine your mouth, review your medical history, and take a CT scan (3D X-ray). This scan is critical. It allows the surgeon to map out exactly where each implant will go.
During this visit, be honest. Tell the dentist if you smoke, drink alcohol, or take blood thinners. Hiding information only leads to complications later.
The Emotional Side Of “Before”
Many patients arrive feeling embarrassed. They hide their smile in photos. They avoid laughing in public. They struggle to eat steak, apples, or even crusty bread.
One patient shared:
“Before my All On Four procedure, I stopped going to restaurants. I was terrified my denture would fly out while I was eating. I felt like I was 80 years old, but I was only 52.”
This emotional weight is real. Acknowledge it. The good news is that the “after” often brings back confidence and joy.
Temporary Vs. Final Teeth
Here is a reality check that many websites avoid: You will receive temporary teeth on the day of surgery. These are not your beautiful final smile. They are functional, but they have limitations.
- Temporary teeth – Made of acrylic or resin. They allow you to eat soft foods and speak normally. They are thicker and less natural looking.
- Final teeth – Made of zirconia or high-grade porcelain. They arrive 4 to 6 months after surgery. They are thinner, stronger, and more aesthetic.
Do not expect Hollywood perfection on day one. Patience is required.
The Day Of Surgery: A Step-By-Step Walkthrough
Understanding the surgery reduces fear. Here is what happens in chronological order.
Step 1: Anesthesia
You will not feel pain during the procedure. Most surgeons use IV sedation (twilight sleep) or general anesthesia. You will be asleep or deeply relaxed. The procedure typically takes 2 to 3 hours per jaw.
Step 2: Extracting Remaining Teeth
If you still have damaged or loose teeth, the surgeon removes them first. This is quick and painless under anesthesia.
Step 3: Placing The Four Implants
The surgeon makes small incisions in your gums. They drill precise holes according to the CT scan plan.
- The two front implants go in straight (vertical position).
- The two back implants go in at an angle (tilted position).
After placing the implants, the surgeon attaches small metal connectors called abutments.
Step 4: Attaching The Temporary Bridge
The lab has already prepared your temporary bridge before surgery. The dentist screws this bridge onto the four abutments. You wake up with a full arch of non-removable teeth.
Note: The temporary bridge is screwed in, not cemented. This is important because the dentist needs to remove it later for cleaning and to place the final bridge.
Step 5: Going Home
You will need a friend or family member to drive you home. The numbness takes a few hours to wear off. You will likely have swelling and some bruising.
The “After” Phase: Recovery Timeline
The “after” is not a single moment. It is a journey of healing, adjustment, and gradual improvement.
The First 24 Hours
- Bleeding: Minor oozing is normal. Bite on gauze pads as directed.
- Swelling: Expect your face to look puffy, like a chipmunk. Ice packs help.
- Diet: Only cold liquids and soft foods (smoothies, yogurt, pudding). No hot drinks for 24 hours.
- Pain: You will have a prescription for pain medication. Most patients describe the pain as a 4 or 5 out of 10, not severe.
Week One
Swelling peaks on day two or three, then slowly goes down. You will eat a soft food diet for the entire first week.
Allowed foods in week one:
- Mashed potatoes
- Scrambled eggs
- Soup (not too hot)
- Protein shakes
- Applesauce
- Pudding and Jell-O
Forbidden foods:
- Crunchy (chips, nuts, crackers)
- Sticky (caramel, taffy, gum)
- Hard (ice, hard candy, bones)
You must also sleep with your head elevated (on two pillows) to reduce swelling. Rinse with warm salt water gently – do not spit hard.
Weeks Two To Six
By week two, most swelling has disappeared. You can return to work and normal social activities. However, your jawbone is still healing around the implants. This process is called osseointegration. It takes time.
During this period:
- Continue eating soft to semi-soft foods.
- Avoid biting directly with the front teeth.
- Use the special water flosser and brushes given by your dentist.
- Do not smoke. Smoking interrupts blood flow and causes implant failure.
Month Four To Six: The Final Bridge
After approximately four to six months, the implants have fused with your bone. You return to the dentist. They remove the temporary bridge and take new impressions. These impressions go to a dental lab.
The lab creates your final bridge made of zirconia or high-performance polymer. This final bridge is:
- Stronger (you can eat steak and nuts).
- More natural looking (customized shape and color).
- Easier to clean (smoother surfaces).
Once the final bridge is screwed in, you are done. Welcome to your permanent smile.
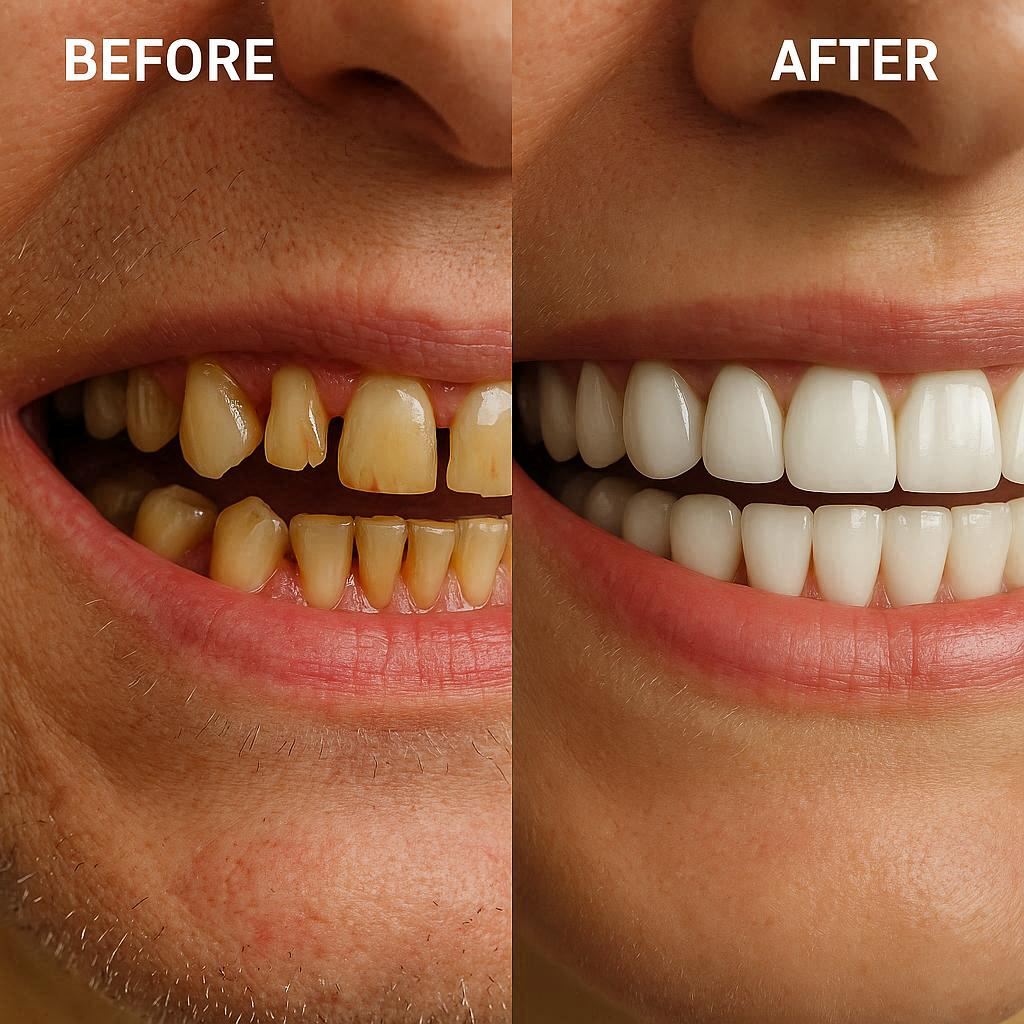
Realistic Results: What Changes (And What Doesn’t)
Let us talk honestly about what improves and what remains a challenge.
What Improves Dramatically
| Before | After (6 months) |
|---|---|
| Loose dentures that click | Fixed teeth that never move |
| Difficulty chewing meat | Normal chewing of most foods |
| Sunken face appearance | Restored lip and cheek support |
| Avoiding social events | Confident smiling and laughing |
| Sore spots from dentures | No more gum irritation |
| Messy adhesives and pastes | No adhesives needed |
What Does NOT Change
- Your hygiene routine changes: You cannot simply brush normally. You must learn to floss under the bridge using superfloss or a water flosser.
- You still need checkups: Implants cannot get cavities, but your gums can get infected (peri-implantitis). You need professional cleanings every 6 months.
- You cannot bite certain things: Never use your new teeth to open packages, crack nuts, or bite hard candy. The teeth can chip.
- The cost is real: This is a significant financial investment. Cheap All On Four is a red flag.
A Realistic “Before And After” Comparison Table
| Aspect | Before Treatment | After Healing (Final Bridge) |
|---|---|---|
| Appearance | Missing teeth or bulky dentures | Natural-looking, fixed smile |
| Chewing ability | 20-30% of normal | 85-95% of normal |
| Speech | Possible lisp or clicking | Clear, normal speech |
| Maintenance | Remove denture nightly | Brush and floss daily |
| Comfort | Denture sores and movement | No movement, gum comfort |
| Longevity | 5-10 years for dentures | 20+ years for implants (with care) |
Foods You Can Eat Again (And Foods To Avoid Forever)
One of the biggest wins of All On Four is eating real food again. But let us be honest about limits.
Yes: You Can Eat These Again
- Steak (cut into small pieces)
- Grilled chicken
- Raw carrots (shredded or sliced thin)
- Apples (sliced, not bitten into whole)
- Crusty bread (softened slightly)
- Nuts (chopped, not whole)
No: Avoid These Forever
- Whole apples or corn on the cob (the biting force is too high)
- Hard candies and ice cubes
- Sticky taffy and caramel (can pull on the bridge)
- Popcorn kernels (can crack the acrylic or zirconia)
- Bones (chicken wings, ribs with small bones)
Pro tip: Think of your All On Four bridge like fine china. It is strong, but you would not use fine china to crack walnuts. Use common sense.
Costs: A Honest Breakdown
This is the part no one likes to discuss, but you need the truth.
The cost of All On Four per jaw varies dramatically based on:
- Your geographic location
- The dentist’s experience
- The material of the final bridge (acrylic vs. zirconia)
- Whether you need extractions or sedation
Estimated Price Ranges (USA, 2025-2026)
| Component | Low-cost provider | Premium provider |
|---|---|---|
| All On Four (one jaw) | $15,000 – $20,000 | $25,000 – $35,000 |
| All On Four (both jaws) | $30,000 – $40,000 | $50,000 – $70,000 |
| CT scan and planning | $500 – $1,500 | Included |
| Temporary bridge | Included | Included |
| Final zirconia bridge | +$5,000 – $10,000 | Included |
Warning signs of a “too good to be true” deal:
- Prices below $10,000 per jaw (usually overseas or inexperienced providers)
- No CT scan before surgery
- Same-day final teeth (not possible without risking failure)
- No written warranty or aftercare plan
Does Insurance Cover It?
Most dental insurance plans do not cover the full cost. However, they may cover extractions, the temporary bridge, or part of the final bridge. Some medical insurance may cover implants if tooth loss resulted from an accident or tumor removal.
Financing options:
- CareCredit
- Lending Club (healthcare loans)
- In-house payment plans (ask your dentist)
Common Problems And How To Solve Them
Not everything goes perfectly. Here are real issues patients face and how to handle them.
Problem 1: The Temporary Bridge Breaks
Acrylic temporary bridges can crack if you eat hard foods. This is common. Do not panic.
Solution: Call your dentist immediately. They can repair the bridge chairside in 30 minutes. In the meantime, eat soft foods only.
Problem 2: Food Gets Trapped Under The Bridge
Because the bridge does not touch your gums everywhere, food can sneak underneath. This causes bad breath and gum inflammation.
Solution: Buy a water flosser (Waterpik). Use it every night. Aim the water jet under the bridge from the cheek side and the tongue side.
Problem 3: An Implant Fails To Fuse
In about 2% to 5% of cases, one implant does not integrate with the bone. This is not a disaster.
Solution: The dentist removes the failed implant. Because you have four implants, the remaining three can still support the bridge in most cases. The dentist may add a replacement implant later.
Problem 4: You Grind Your Teeth At Night
Bruxism (teeth grinding) puts extreme force on implants. Implants are rigid; they do not absorb shock like natural teeth. Grinding can crack the bridge or loosen screws.
Solution: Wear a custom nightguard over your All On Four bridge. Yes, you can wear a nightguard on implants. Your dentist can make one.
Long-Term Care: How To Make Your Implants Last 30+ Years
Implants themselves do not decay, but the surrounding tissues do. Follow these rules for a lifetime of success.
Daily Hygiene Routine
- Brush twice daily with a soft toothbrush. Use a sulcus brush (small cone-shaped brush) to clean around each implant.
- Water floss once daily – Use medium pressure. Floss under the entire bridge.
- Interdental brushes – These tiny brushes go between the bridge and your gums.
- No smoking – Smokers have a 300% higher failure rate over 10 years.
Professional Maintenance
- Cleanings every 6 months – The hygienist uses special plastic scalers (metal ones scratch implants).
- X-rays every 12-24 months – To check bone levels around each implant.
- Screw tightening annually – The small screws holding your bridge can loosen over time. The dentist will check and retorque them.
Remember: Neglecting hygiene leads to peri-implantitis – a condition similar to gum disease that destroys bone around implants. This is the number one cause of late implant failure.
All On Four Vs. Alternatives: Which Is Right For You?
You have options. Let us compare honestly.
| Treatment | Pros | Cons | Best for |
|---|---|---|---|
| All On Four | Fixed teeth, no bone graft often needed, immediate temporary teeth | Expensive, requires surgical skill | Patients with moderate bone loss |
| Traditional dentures | Low cost, non-surgical | Loose, painful sores, affects speech | Patients on very tight budgets |
| Implant-supported denture (2-4 implants) | More stable than regular denture, lower cost than All On Four | Removable (clips on/off), still moves slightly | Patients who want removable option |
| All On Six (6 implants) | Even more support, less stress per implant | More expensive, may require bone grafting | Patients with good bone density |
| Single implants (each tooth) | Most natural, easy to clean | Very expensive for full arch, takes 12-18 months | Patients missing only a few teeth |
Which One Should You Choose?
- Choose All On Four if you want fixed, non-removable teeth and have been told you lack bone.
- Choose implant-supported dentures if your budget is limited but you want better stability than regular dentures.
- Choose traditional dentures only as a temporary solution or if you cannot have surgery for medical reasons.
Frequently Asked Questions (FAQ)
1. Is All On Four painful?
Most patients report discomfort, not severe pain, for 3 to 5 days after surgery. The procedure itself is painless because of anesthesia. Over-the-counter pain relievers like ibuprofen manage most post-op discomfort.
2. Can I get All On Four on both jaws at once?
Yes. Many patients do both upper and lower arches in one surgery. However, recovery is harder because you cannot chew at all for several days. You will need a liquid diet. Some dentists prefer to do one jaw, wait 3 months, then do the second.
3. How long do All On Four implants last?
With proper care, the titanium implants can last 30 years to a lifetime. The final zirconia bridge typically lasts 15 to 20 years before needing replacement. The acrylic temporary bridge lasts only 4 to 6 months.
4. Can I sleep without the bridge?
No. The bridge is fixed (screwed in). You cannot remove it at night. This is a good thing – it never falls out. You clean it while it stays in your mouth.
5. What happens if one implant breaks?
Implant fracture is extremely rare (less than 1% of cases). If it happens, the surgeon removes the broken implant and places a new one. The bridge remains supported by the other three implants during healing.
6. Will my face look different?
Yes, but in a good way. Natural teeth support your lips and cheeks. When teeth are missing, your face looks sunken or aged. All On Four restores that support, giving you a more youthful appearance.
7. Can I go overseas for cheaper All On Four?
You can, but be careful. Many “dental tourism” clinics offer low prices ($7,000 to $10,000 per jaw). However, if complications arise, you cannot easily return. There is also no long-term warranty. If you choose this route, research the clinic thoroughly and plan for follow-up care at home.
8. How soon can I eat a steak?
You can eat soft meats like meatloaf or tender chicken after 2 weeks. A real steak (medium-rare, chewy) should wait until you have your final bridge at 4 to 6 months. Cutting steak into small pieces is always recommended.
Additional Resources
For more detailed information and to find a certified provider, visit the American Academy of Implant Dentistry (AAID) :
🔗 www.aaid.com (Search for “Find an implant dentist”)
This resource allows you to search for dentists who have completed advanced training in implantology. Always choose a provider who is a Fellow or Associate Fellow of the AAID.
Conclusion
The journey of All On Four dental implants before and after is a transformation that goes beyond cosmetics. Before treatment, many patients struggle with loose dentures, limited diets, and lost confidence. After healing, they enjoy fixed, natural-looking teeth that allow them to eat, speak, and smile freely. However, the process requires patience through a soft-food recovery period, commitment to daily hygiene, and a significant financial investment. With proper care, this solution offers a durable, life-changing result for those missing all teeth in one or both jaws.