Dental Office Room: A Complete Guide to Designing a Functional and Comfortable Treatment Space
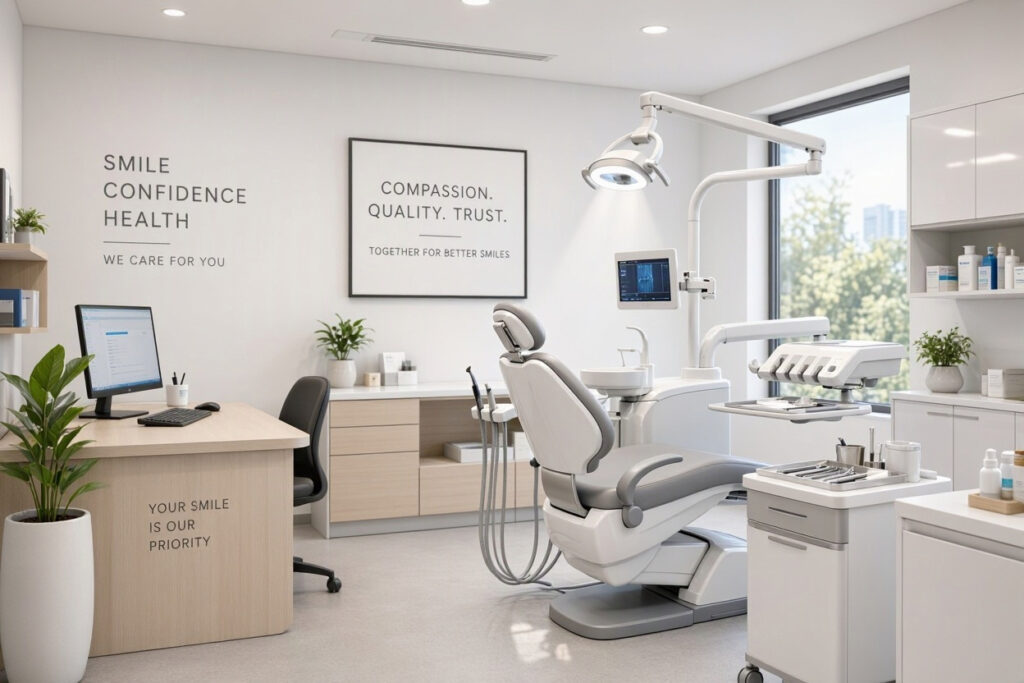
The treatment room is where dentistry actually happens. Patients may judge your practice by the waiting room, but they experience your care in the operatory. Every detail matters here: the position of the chair, the reach of the instruments, the view from the ceiling, the temperature of the room. A well-designed dental office room makes treatment faster, safer, and more comfortable for everyone. This guide covers the practical steps to get it right.
Why a Single Room Deserves Careful Planning
A treatment room is a small space with a big job. It must support precise clinical work, protect infection control standards, keep patients comfortable, and allow staff to move without strain. When one of these elements fails, the whole appointment suffers.
Dentists and hygienists spend most of their day in these rooms. Poor ergonomics lead to back pain, neck strain, and fatigue. Bad layouts cause wasted steps and slower appointments. Small improvements in room design pay off every single day.
“You will spend thousands of hours in your operatory. Design it like your career depends on it, because your body will remind you if you don’t.” — Dental Ergonomics Specialist
The Core Goals of a Dental Treatment Room
- Clinical efficiency: Everything within reach, nothing wasted.
- Infection control: Surfaces that clean easily and resist bacteria.
- Patient comfort: A calm environment that reduces anxiety.
- Ergonomics: A setup that protects the clinician’s body.
- Safety: Clear pathways, proper ventilation, and compliant equipment.
Room Size and Layout
Size affects everything that follows. A room that is too small feels cramped and limits equipment. A room that is too large wastes space and money.
| Room Type | Minimum Size | Recommended Size |
|---|---|---|
| Hygiene operatory | 100 sq ft | 120 sq ft |
| General dentistry | 120 sq ft | 140 sq ft |
| Surgical or specialty | 150 sq ft | 180+ sq ft |
| Pediatric operatory | 120 sq ft | 150 sq ft |
Placement of the Chair
Chair position is the single most important layout decision.
- Place the chair so the patient’s feet point away from the door for privacy.
- Allow at least 30 inches of clearance on the working side of the chair.
- Keep a clear path from the door to the chair for patients and staff.
- Position the chair so the clinician can work seated without twisting.
Left-Handed and Right-Handed Setups
Dental rooms are not one-size-fits-all. If you have left-handed clinicians, plan a room that supports them. Delivery systems, cabinetry, and instrument placement need to mirror the standard layout. Discuss this during the design phase, not after installation.
Equipment Essentials
A functioning room needs the right equipment in the right places.
Must-Have Equipment
- Dental chair with foot controls and adjustable positioning
- Delivery system with handpieces, air, and water
- Operating light with adjustable intensity
- Suction and saliva ejector
- Assistant’s instrumentation area
- Sink with hands-free controls
- X-ray unit or access to imaging
- Computer or monitor for records and imaging
- Cabinetry for supplies
- Biohazard and sharps disposal containers
Equipment Layout Tips
- Keep the delivery system on the clinician’s dominant side.
- Place the assistant’s area within arm’s reach but out of the clinician’s path.
- Mount monitors at eye level for both clinician and patient.
- Put the sink near the entrance for easy handwashing before and after treatment.
- Store high-use items in the top drawers, low-use items higher or lower.
Ergonomics That Protect Your Body
Musculoskeletal injuries are common in dentistry. Good room design reduces the risk.
Ergonomic Guidelines
- Adjust chair height so the clinician’s thighs are parallel to the floor.
- Use a stool with lumbar support and a foot ring.
- Position the patient’s head at the clinician’s elbow height.
- Keep instruments within a 20-inch reach zone.
- Use magnification and proper lighting to avoid leaning forward.
- Alternate between seated and standing positions when possible.
Important Note: Even the best room cannot fix poor posture. Combine good design with regular stretching and ergonomic training for your team.
Infection Control Through Design
Surfaces and layout affect how quickly and thoroughly a room can be cleaned.
| Surface Type | Cleanability | Best Use |
|---|---|---|
| Stainless steel | Excellent | Countertops, instrument trays |
| Solid surface (quartz, Corian) | Very good | Cabinetry tops, sinks |
| Seamless vinyl flooring | Very good | Floors |
| Laminate | Good | Cabinetry faces |
| Porous tile with grout | Poor | Avoid in clinical areas |
| Fabric upholstery | Poor | Avoid on chairs and stools |
Design Choices That Support Hygiene
- Choose seamless flooring with coved baseboards to prevent buildup.
- Avoid horizontal ledges where dust collects.
- Use hands-free faucets and soap dispensers.
- Keep countertops clear of clutter.
- Provide closed storage for supplies.
- Place sharps containers at eye level and near point of use.
Patient Comfort and Anxiety Reduction
A calm patient is easier to treat. Small design choices make a real difference.
Comfort Ideas
- Add a ceiling element patients can look at during treatment.
- Offer noise-canceling headphones or soft background music.
- Provide a warm blanket or neck pillow.
- Keep the room temperature comfortable and adjustable.
- Use soft, warm lighting when possible.
- Hide instrument trays until they are needed.
- Add a small shelf for personal items like glasses and phones.
Tip: Ask patients what would make them more comfortable. Their answers often surprise you and cost nothing to implement.
Lighting in the Treatment Room
Lighting serves two masters: clinical precision and patient comfort.
Lighting Layers
- Operatory light: Focused, adjustable, and easy to reposition.
- Ambient lighting: Soft overhead light that is not harsh.
- Task lighting: For charting, computer work, and setup.
- Natural light: If available, use blinds to control glare.
Important Note: Avoid fluorescent fixtures with visible flicker. They cause eye strain for staff and discomfort for sensitive patients.
Storage Inside the Room
Clutter slows you down and complicates cleaning. Plan storage carefully.
Storage Principles
- Store only what the room needs for a typical day.
- Use drawer dividers and labeled bins.
- Keep a small backup supply of high-use items.
- Reserve one drawer for personal items.
- Add a locked cabinet for controlled substances if required.
Room Turnover Efficiency
Between patients, the room must be cleaned and reset quickly. Design supports speed.
- Keep cleaning supplies in a dedicated caddy near the door.
- Store barriers and disposable covers within reach.
- Position the computer so it can be wiped without unplugging anything.
- Leave clear floor space for easy mopping.
- Create a simple reset checklist and post it inside a cabinet door.
Budgeting for a Treatment Room
Costs vary widely based on whether you are building new or refreshing an existing room.
| Item | Typical Cost | Notes |
|---|---|---|
| Dental chair and delivery system | $15,000 – $45,000 | Varies by brand and features |
| Operatory light | $2,000 – $6,000 | LED options are efficient |
| Cabinetry (custom) | $5,000 – $15,000 | Modular options cost less |
| Sink and plumbing | $800 – $3,000 | Includes installation |
| Flooring (per sq ft) | $4 – $12 | Seamless vinyl recommended |
| Monitor and computer | $800 – $2,500 | Imaging-ready setup |
| Small equipment and supplies | $1,000 – $3,000 | Trays, barriers, containers |
Note: These are planning estimates only. Get quotes from dental equipment suppliers and contractors before committing to a budget.
Common Mistakes to Avoid
- Cramming too much into a small room: Patients and staff feel squeezed.
- Ignoring the clinician’s dominant hand: Layouts that force awkward reaching.
- Choosing pretty flooring over practical flooring: Grout lines trap debris.
- Skipping cable management: Tangled cords collect dust and slow cleaning.
- Poor ventilation: Odors and aerosols linger longer than they should.
- No plan for storage: Supplies pile up on counters.
- Forgetting the patient’s view: A blank ceiling feels clinical and cold.
Frequently Asked Questions
How big should a dental treatment room be?
At least 100 square feet for hygiene, with 120 to 140 square feet recommended for general dentistry. Larger rooms suit surgical and specialty care.
What equipment is essential in a dental office room?
A dental chair, delivery system, operatory light, suction, sink, cabinetry, computer, and proper waste containers. Everything else depends on the services you offer.
How can I make a dental room less intimidating for patients?
Add a ceiling feature, soften the lighting, hide instruments until needed, offer headphones, and keep the room warm and tidy.
What flooring is best for a dental operatory?
Seamless vinyl or sheet flooring with coved baseboards. It resists moisture, cleans easily, and leaves no grout lines for bacteria.
How often should a treatment room be updated?
Plan for a full refresh every 10 to 15 years. Replace worn upholstery and flooring sooner as needed.
Additional Resource
For clinical design standards and infection control guidance, visit the Centers for Disease Control and Prevention (CDC) Dental Infection Control page for current recommendations.
Conclusion
A well-designed dental office room supports clinical precision, protects your body, and comforts your patients. Start with size and chair placement, choose cleanable surfaces, invest in ergonomics, and plan storage carefully. Small, thoughtful choices in one room improve every appointment you run.