How Patients Can Clean Dental Implants?
A dental implant is a significant investment in your health and appearance. It replaces a missing tooth root and supports a crown, bridge, or denture. But an implant is not immune to disease. The longevity of your implant depends almost entirely on how you clean and maintain it. Unlike a natural tooth, an implant has a different attachment to the surrounding tissues, making it vulnerable to bacterial destruction in unique ways. This guide provides a comprehensive, step-by-step manual on how patients can clean their dental implants. We will cover the specific tools, techniques, and professional maintenance protocols required for single crowns, implant bridges, and implant-supported dentures. You will learn to protect your investment and prevent peri-implant disease.
The Fundamental Difference: Tooth vs. Implant
To clean an implant effectively, you must understand how it differs from a natural tooth. The differences dictate the cleaning approach.
A natural tooth is connected to the surrounding bone by the periodontal ligament, a network of collagen fibers that act as a shock absorber and a biological seal. Blood vessels in the ligament deliver immune cells and antibodies to fight bacterial invasion. The gum tissue attaches to the tooth root surface via a junctional epithelium and connective tissue fibers that insert perpendicularly into the root cementum.
A dental implant has no periodontal ligament. It fuses directly to the bone through osseointegration, a rigid, non-resilient connection. There is no ligament blood supply. The soft tissue attaches to the implant or abutment surface via a thin junctional epithelium and a circular cuff of connective tissue fibers that run parallel to the implant surface, not perpendicularly. This perimucosal seal is weaker and less vascular than the natural attachment. When bacteria invade this vulnerable interface, the immune response is less effective, and bone destruction can progress more rapidly than periodontitis around a natural tooth.
Cleaning an implant is therefore not about preventing cavities. It is about mechanically disrupting the bacterial biofilm that forms on the implant surfaces below the gumline, before the host’s inflammatory response destroys the supporting bone.
The Essential Implant Cleaning Toolkit
Generic toothbrushing is insufficient. Specific tools are required to access the critical peri-implant crevice. Assemble the following tools based on the type of implant restoration you have.
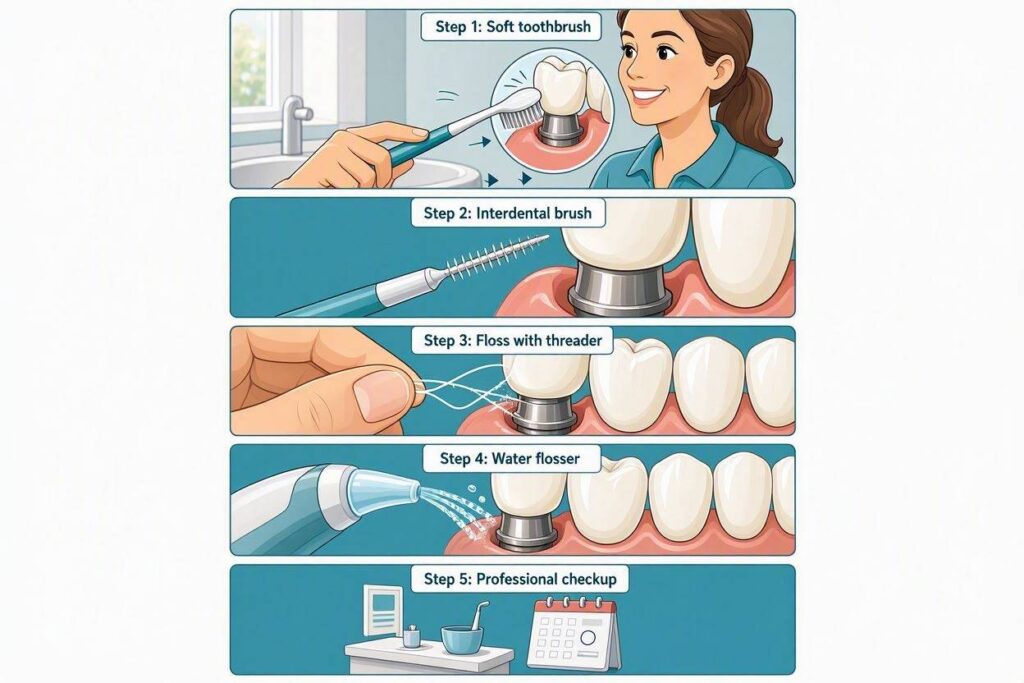
Soft-Bristled Manual or Electric Toothbrush
A toothbrush with soft, rounded bristles is the foundation. Medium or hard bristles can traumatize the delicate peri-implant mucosa and cause recession. An electric toothbrush with a pressure sensor is an excellent investment. The sensor alerts you if you are applying excessive force. The oscillating-rotating or sonic action disrupts plaque effectively on the smooth surfaces of the implant crown.
Use the toothbrush on the facial, lingual, and occlusal surfaces of the implant crown, just as you would on a natural tooth. Brush for a full two minutes, twice daily. Spend extra time at the gum margin, angling the bristles at 45 degrees toward the gumline.
Interdental Brushes (Proxy Brushes)
Interdental brushes are small, bottle-brush-shaped brushes that clean the spaces between teeth. For an implant crown, the interdental brush is the single most important tool. It accesses the concave embrasure spaces on either side of the crown and disrupts the biofilm at the implant-gum interface.
Select the largest interdental brush that passes comfortably through the space without forcing. The brush should encounter slight resistance from the soft tissue but not pain. Insert the brush from the facial side, gently move it in and out several times, and then from the lingual side if accessible. Never force a brush that is too large; you can damage the gum papilla. Use interdental brushes at least once daily.
Implant-Specific Floss or Dental Tape
Standard floss can shred on the rough surfaces of an implant restoration or on the margin of the crown. Implant-specific floss has a textured, sponge-like component that cleans the implant surfaces and the underside of the restoration. Oral-B Super Floss and similar products have a stiffened end to thread under bridges, a spongy section, and a section of regular floss.
For a single implant crown, traditional floss may be used, but the shred-resistant, wider PTFE (polytetrafluoroethylene) floss is preferred. Wrap the floss around the crown in a C-shape and gently slide it below the gumline, adapting it to the surface of the restoration. Move the floss up and down several times against the implant surface.
Water Flosser (Oral Irrigator)
A water flosser uses a pulsating stream of water to flush out food debris and disrupt bacterial plaque from areas that mechanical tools cannot reach. For implant patients, a water flosser is a powerful adjunct, particularly for implant-supported bridges and dentures.
Use a water flosser with a non-metal tip, typically a soft rubber or plastic irrigator tip designed for implants. Some manufacturers offer specialized implant tips with a gentle rubber end. Fill the reservoir with warm water. Set the pressure to a comfortable medium setting; high pressure is not necessary and can detach the gum tissue from the implant. Direct the water stream at the gumline around each implant, tracing the margin of the crown. For implant bridges, direct the stream under the pontic (the false tooth) and around the implant abutments. Use the water flosser once daily.
Rubber Tip Stimulator and End-Tufted Brushes
A rubber tip stimulator is a cone-shaped rubber point on the end of a handle. It can be used to gently trace the gum margin around the implant, removing soft plaque and stimulating circulation. An end-tufted brush has a small, compact head of bristles that can access the distal surface of the most posterior implant, an area notoriously difficult to clean. These are supplementary tools for patients with limited dexterity or specific access challenges.
Cleaning a Single Implant Crown
A single implant crown is the most straightforward implant restoration to clean, but it still requires a dedicated protocol. The critical areas are the buccal (facial) margin and the interproximal embrasures.
The Daily Routine for a Single Crown
- Brush: Use your soft electric or manual toothbrush, angling the bristles at 45 degrees into the sulcus around the crown. Brush the facial, lingual, and chewing surfaces. Spend a full two minutes.
- Interdental Brush: Insert the correctly sized interdental brush between the implant crown and the adjacent natural tooth on both the mesial and distal sides. Move it in and out gently several times. Perform this step at least once daily, preferably in the evening before bed.
- Floss: If the space is too tight for an interdental brush, use a shred-resistant PTFE floss. Adapt the floss to the contour of the implant crown and gently slide it below the gumline, moving it up and down against the restoration surface.
- Water Flosser (Optional Adjunct): Use the water flosser to flush the sulcus, focusing on the gum margin. This is especially beneficial if the gum tissue is prone to inflammation or if food trapping is a persistent problem.
The Weekly Deep Clean
Once a week, perform an additional, more meticulous cleaning session. Use a disclosing tablet or solution to stain the plaque biofilm on your teeth and implant. The pink or blue stain reveals the areas you are missing with your daily routine. Target these missed areas with the interdental brush and water flosser until the stain is completely removed. This self-audit process dramatically improves the effectiveness of your home care.
Cleaning an Implant-Supported Bridge
An implant-supported bridge spans a gap, with the false teeth (pontics) resting on the gum tissue and the bridge anchored by implants on either side. The under-surface of the bridge and the areas around the implant abutments are plaque traps.
The Super Floss Protocol
Super Floss is the essential tool for cleaning under an implant bridge. The stiffened end is threaded under the pontic. The spongy section is then pulled back and forth to wipe the concave tissue surface of the bridge and polish the abutment surfaces. The regular floss section cleans around the implant abutments.
Thread the Super Floss under the bridge from the facial side to the lingual side. Grasp the spongy section with both hands and move it back and forth in a shoe-shine motion, ensuring contact with the entire underside of the pontic. Repeat for each pontic space.
The Water Flosser with a Directed Tip
A water flosser is almost mandatory for implant bridge patients. The pulsating water stream reaches the areas under the bridge that even Super Floss cannot fully access. Use a soft implant or orthodontic tip. Direct the jet under the bridge from the facial and lingual aspects. Add a non-alcoholic antimicrobial mouth rinse, such as diluted chlorhexidine (if prescribed) or a chlorine dioxide-based rinse, to the water flosser reservoir for added biofilm control.
Interdental Brushes for Abutment Access
Access the spaces between the implant abutments and any natural teeth with an interdental brush. The abutment-gingiva interface is the peri-implantitis initiation zone. Each abutment must be cleaned individually as though it were a single crown.
Cleaning an Implant-Supported Overdenture (Snap-On Denture)
An overdenture snaps onto a bar or individual locator abutments attached to the implants. The denture must be removed for cleaning, and the abutments and bar in the mouth must be cleaned separately.
Cleaning the Removable Overdenture
Remove the overdenture. Rinse it under running water to remove loose debris. Brush the denture with a soft denture brush and a non-abrasive denture cleanser. Do not use toothpaste; it is too abrasive and will scratch the polished surface, creating micro-retentive grooves for bacteria. Soak the denture overnight in a denture-cleaning solution according to the manufacturer’s instructions. This chemical soak kills Candida albicans and other microorganisms. Rinse thoroughly before reinserting the denture in the morning.
Cleaning the Locator Abutments and Bar
While the denture is out, clean the abutments or bar that remain in your mouth. The locator abutments are small, mushroom-shaped attachments. The bar is a metal framework. Both are highly plaque-retentive.
Use a soft toothbrush and a low-abrasive toothpaste or an antibacterial gel to brush around each locator abutment and along the entire bar. A small interdental brush or a specialized locator abutment brush (a tiny circular brush that fits over the abutment) is exceptionally effective. Wrap a piece of Super Floss around the bar and move it back and forth to polish the metal surface. Use a water flosser to irrigate thoroughly around all components. The goal is to remove every trace of biofilm before the denture is reinserted.
The Importance of Nocturnal Removal
The overdenture should be removed at night while you sleep. Leaving a snap-on denture in place 24 hours a day creates a continually moist, stagnant environment that promotes bacterial and fungal overgrowth. The soft tissues need a period of rest and exposure to saliva’s natural antimicrobial properties. Furthermore, nocturnal removal eliminates the constant low-grade pressure on the underlying implants and tissues. Your dentist will give you a specific recommendation, but a period of overnight removal is standard.
Cleaning a Fixed Full-Arch Implant Bridge (All-on-4 / All-on-6)
A fixed full-arch bridge is screw-retained to four to six implants and is not removed by the patient. This restoration presents the greatest home-care challenge. The bridge is a complex, extensive structure with multiple contours, and the implants are deeply situated.
The Water Flosser as Primary Tool
For the All-on-4 patient, the water flosser is not optional; it is essential. Use it daily with a non-metal tip. Direct the stream along the gumline of the entire bridge, from the facial and lingual aspects. Tilt the tip to access the interface between the bridge framework and the gum tissue. Use the water flosser to flush out food debris that accumulates under the bridge.
Super Floss and Floss Threaders
The bridge typically has small access channels between the teeth where Super Floss or a floss threader can be inserted. Thread the floss under the bridge and polish the surfaces. This is time-consuming, requiring patience and dexterity, but it is necessary.
Interdental Brushes for Accessible Embrasures
Where the bridge has open embrasures, use an appropriately sized interdental brush to clean between the bridge and around the implant access areas.
Professional Maintenance is Non-Negotiable
The fixed full-arch bridge must be professionally removed, cleaned, and evaluated periodically. The typical interval is every 6 to 12 months. The dentist or hygienist unscrews the bridge, inspects the implants and the bridge underside, decontaminates all surfaces, and retorques the screws. This professional visit compensates for the limitations of home care.
The Role of Antimicrobial Rinses and Gels
Mechanical disruption of biofilm is the primary goal. Chemical agents are adjuncts, not substitutes.
Chlorhexidine Gluconate
Chlorhexidine is a potent prescription antimicrobial mouthwash. It binds to oral tissues and implant surfaces, providing a sustained release. It is typically prescribed for a short course after implant surgery or during an acute peri-implant mucositis flare. Long-term use causes brown staining of the teeth and tongue, alters taste, and can increase calculus formation. It is not a long-term maintenance solution.
Non-Alcoholic, Non-Staining Rinses
Chlorine dioxide-based rinses and essential oil rinses (alcohol-free formulations) can reduce bacterial load. Adding a capful to the water flosser reservoir provides a low-level antimicrobial flush. These are safe for long-term daily use.
Antimicrobial Gels
Gels containing hyaluronic acid, chlorhexidine, or stabilized chlorine dioxide can be applied with an interdental brush or a rubber tip stimulator directly into the peri-implant sulcus. This targeted delivery is useful for sites showing early signs of mucositis.
Professional Maintenance: The Hygienist’s Role
Home care is performed daily. Professional maintenance is performed at a recall interval determined by your dentist or periodontist, typically every 3 to 6 months.
Peri-Implant Probing and Assessment
The hygienist probes the peri-implant sulcus with a specialized plastic or titanium-coated periodontal probe. The probing depth, bleeding on probing, and presence of suppuration (pus) are recorded. This data tracks the stability of the peri-implant tissues over time. Increasing probing depths or bleeding is an early warning of disease. The hygienist compares the current probing depths to the baseline established after implant restoration.
Professional Debridement
The hygienist removes biofilm and calculus from the implant surfaces using instruments that will not scratch the titanium or zirconia. Metal scalers and ultrasonic tips are contraindicated because they scratch the implant, creating a rough surface that accelerates plaque accumulation. The hygienist uses plastic, titanium-coated, or carbon-fiber curettes and a specialized non-metal ultrasonic tip. The abutment, the implant collar, and, if accessible, the implant body below the gumline are debrided. The implant crown is polished with a non-abrasive paste and a rubber cup.
Patient Education Reinforcement
The professional maintenance visit is an opportunity for the hygienist to observe your home-care technique and provide corrective instruction. A disclosing solution may be used to reveal missed areas. If specific areas show persistent inflammation, the hygienist can recommend a different interdental brush size or a modified technique.
Conclusion
Patients clean dental implants with a layered daily protocol: a soft electric toothbrush for the crown surfaces, an interdental brush and shred-resistant floss to mechanically disrupt biofilm at the vulnerable implant-gum interface, and a water flosser for the subgingival and inaccessible areas around bridges and dentures. Implant-supported overdentures must be removed, brushed, and soaked overnight while the locator abutments are separately cleaned, and fixed full-arch bridges require daily water flossing plus periodic professional removal and decontamination. Consistent, meticulous home care combined with 3- to 6-month professional maintenance using non-metal instruments is the only proven strategy to prevent peri-implant disease and achieve decades of implant service.
Frequently Asked Questions
Can I use a regular toothbrush on my implant crown?
Yes, but it must be a soft-bristled brush. Medium or hard bristles can traumatize the peri-implant mucosa and contribute to recession. An electric toothbrush with a pressure sensor is ideal. The toothbrush effectively cleans the smooth surfaces of the crown. It cannot access the interproximal spaces or the critical implant-gum interface where disease begins. You must supplement brushing with interdental cleaning.
How often should I see the hygienist for implant cleaning?
A standard recall interval is every 3 to 6 months. If you have a history of periodontitis, are a smoker, or have shown signs of peri-implant mucositis, a 3-month interval is appropriate. A patient with excellent home care and no risk factors may be seen every 6 months. Your dentist or periodontist will individualize the recall interval.
Is bleeding around my implant a sign of a problem?
Yes. Healthy peri-implant tissues do not bleed when probed or brushed. Bleeding indicates inflammation—peri-implant mucositis if limited to the soft tissue, or peri-implantitis if bone loss is present. If you notice bleeding when you clean your implant, increase the frequency and thoroughness of your interdental cleaning and water flossing in that area, and schedule a professional evaluation. Early intervention can reverse mucositis before bone is lost.
Can I whiten my implant crown?
No. Dental porcelain, zirconia, and composite resin do not respond to whitening agents. The color of the implant crown is permanent. If the natural teeth adjacent to the implant are whitened, the implant crown may no longer match. It is advisable to whiten your natural teeth before the implant crown is fabricated, so the ceramist matches the crown to your desired tooth shade.
Additional Resource
The American Dental Hygienists’ Association provides a consumer-friendly guide to oral care products at adha.org. The site includes a searchable database of products that have earned the ADA Seal of Acceptance, which verifies that interdental brushes, water flossers, and antimicrobial rinses meet rigorous standards for safety and efficacy. When purchasing implant cleaning tools, looking for the ADA Seal is a simple way to ensure quality.