What Is The Number Of Steps In A Dental Implant?
Dental implant treatment follows a structured sequence of clinical steps that span several months from initial consultation to final restoration. Patients considering implants often want to understand the treatment journey before committing. Knowing the number of steps helps set realistic expectations about timeline, appointments, and the commitment required.
A complete single-tooth dental implant treatment typically involves 6 to 8 major steps spanning 4 to 12 months from consultation to final crown delivery. These steps include initial consultation and planning, any necessary preparatory procedures, implant placement surgery, a healing and integration period, abutment placement, and final crown delivery. Some protocols combine steps, reducing the total number, while complex cases requiring bone grafting add steps and extend the timeline.
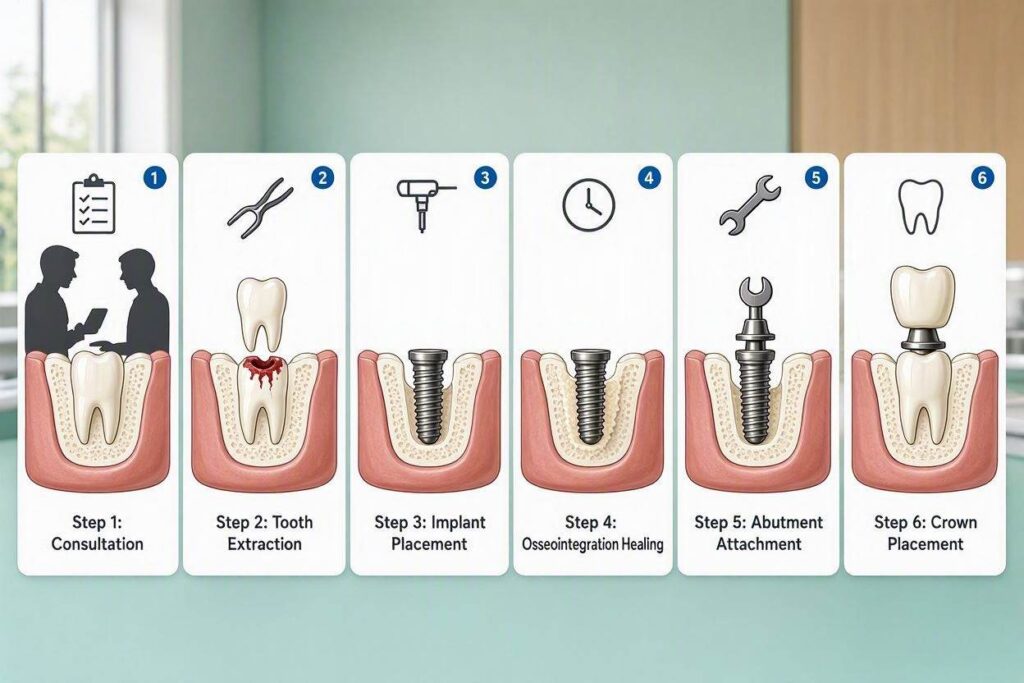
Step-by-Step Breakdown of Dental Implant Treatment
Each step in the implant process serves a specific clinical purpose. Understanding what happens at each stage helps patients navigate treatment with confidence.
Step 1: Initial Consultation and Examination
The first step establishes whether you are a candidate for dental implants and what treatment approach best suits your situation.
What Happens:
The dentist reviews your medical and dental history, examining for conditions that affect implant success. A comprehensive oral examination evaluates the missing tooth site, adjacent teeth, gum health, and bite relationship. Diagnostic imaging is ordered or performed. The dentist discusses treatment options, timelines, and costs.
Imaging Requirements:
Panoramic X-rays provide an overview of both jaws, showing bone height and proximity to anatomical structures. Cone beam computed tomography (CBCT) offers three-dimensional imaging essential for precise implant planning. This scan reveals bone width, density, and the exact location of nerves and sinuses.
Duration: 60-90 minutes
Cost: $100-$400 (often credited toward treatment)
Step 2: Treatment Planning and Case Design
After gathering diagnostic information, the implant team develops a detailed treatment plan.
What Happens:
The dentist or treatment team analyzes CBCT data using specialized software. Implant position, size, and angulation are determined virtually. A surgical guide may be fabricated to transfer the planned implant position to the surgical field. The restorative plan is developed simultaneously, ensuring implant position serves the final crown design.
For complex cases, this step may involve communication between the surgical specialist and the restorative dentist to coordinate implant positioning with prosthetic goals.
Duration: 1-2 weeks (laboratory and planning time; no patient appointment required beyond possibly a brief review discussion)
Cost: $200-$600 (surgical guide fabrication; may be included in treatment fee)
Step 3: Preparatory Procedures (If Needed)
Not all patients require preparatory procedures, but many benefit from them. This step is conditional based on individual needs.
Tooth Extraction:
If a failing tooth remains at the implant site, it must be removed. Simple extractions are performed under local anesthesia. Surgical extractions may be needed for broken or impacted teeth. Socket preservation grafting is often performed simultaneously to maintain bone volume for future implant placement.
Healing After Extraction: 4-12 weeks before implant placement (longer for surgical extractions)
Bone Grafting:
Insufficient bone volume requires grafting to create an adequate foundation. Minor grafting (socket preservation) adds minimal time and cost. Major grafting (ridge augmentation, block grafts) requires 3-6 months of healing before implant placement.
Sinus Lift:
Upper back teeth sites with insufficient bone height beneath the sinus require a sinus lift procedure. Bone graft material is placed beneath the elevated sinus membrane. Healing requires 4-9 months before implant placement.
Periodontal Treatment:
Active gum disease must be treated before implant surgery. Scaling and root planing or more advanced periodontal therapy may be needed. Treatment typically requires 4-8 weeks to establish healthy gum tissues.
Additional Steps If Required: 1-3 preparatory steps
Added Timeline: 1-9 months depending on procedure
Step 4: Implant Placement Surgery
The surgical step involves placing the titanium implant post into the jawbone.
What Happens:
Local anesthesia or sedation is administered. The surgeon makes an incision in the gum tissue to expose the underlying bone. A series of precisely sized drills creates an osteotomy (hole) in the bone matching the implant dimensions. The implant is threaded or pressed into place. Primary stability is verified. A cover screw or healing abutment is placed on top of the implant. The gum tissue is sutured closed or fitted around the healing abutment.
Surgical Duration: 60-90 minutes for a single implant; longer for multiple implants
Immediate Post-Operative Period: Swelling and discomfort peak at 48-72 hours; most patients resume normal activities within 2-4 days
Step 5: Osseointegration (Healing and Integration)
This critical biological step is not a patient appointment but a healing period essential to implant success.
What Happens:
The implant surface bonds with surrounding bone through osseointegration. Bone cells grow onto the microscopically roughened titanium surface, creating a structural connection capable of bearing chewing forces. The implant must remain undisturbed during this period. Temporary restorations may be worn but must not load the implant.
Healing Duration:
Lower jaw: 3-4 months
Upper jaw: 4-6 months
Sites requiring bone grafting: 6-9 months
Patient Experience:
The implant is beneath the gum tissue (two-stage approach) or a healing abutment protrudes through the gum (one-stage approach). There is typically no discomfort during this phase. The temporary tooth replacement is worn if aesthetics require it.
“Osseointegration is the biological foundation of implant success. The 3-6 month healing period cannot be rushed without risking implant failure. This waiting period is the most common source of patient frustration, but it is also the step that makes implant treatment predictable and durable.” — American Academy of Implant Dentistry
Step 6: Abutment Placement (Implant Uncovering)
Once osseointegration is confirmed, the implant is exposed or accessed for connection to the prosthetic components.
What Happens (Two-Stage Approach):
A small incision exposes the implant cover screw. The cover screw is removed. A healing abutment is placed that extends through the gum tissue. The gum is allowed to heal around the healing abutment for 2-4 weeks, creating a natural emergence profile.
What Happens (One-Stage Approach):
If a healing abutment was placed at surgery, this step simply involves removing it and replacing it with the final abutment or taking impressions directly.
Duration: 30-60 minutes
Healing After Abutment Placement: 2-4 weeks for gum tissue maturation
Step 7: Impressions and Crown Fabrication
This step captures the precise implant position for laboratory fabrication of the final crown.
What Happens:
The healing abutment is removed. An impression coping is attached to the implant. A dental impression (traditional or digital) captures the implant position relative to adjacent teeth and opposing arch. Shade selection determines crown color. The impression is sent to the dental laboratory. A temporary crown may be placed on the implant during fabrication.
Laboratory Time: 2-4 weeks
Digital Workflow (If Available):
Intraoral scanning captures implant position digitally, eliminating physical impressions. Digital design and milling may reduce laboratory time to 1-2 weeks in some cases.
Step 8: Final Crown Delivery
The final step delivers the permanent implant-supported restoration.
What Happens:
The temporary restoration or healing abutment is removed. The final abutment is torqued to specification. The implant crown is tried in and evaluated for fit, bite, and aesthetics. Adjustments are made as needed. The crown is cemented or screw-retained onto the abutment. Bite is verified again. Oral hygiene instructions for implant maintenance are reviewed.
Duration: 45-90 minutes
Follow-Up: Periodic evaluation of implant health at regular dental checkups
| Step | Clinical Procedure | Timing | Patient Appointments |
|---|---|---|---|
| 1 | Consultation and Imaging | Day 1 | 1 visit |
| 2 | Treatment Planning | 1-2 weeks | 0-1 visit |
| 3 | Preparatory Procedures | Variable (if needed) | 1-3 visits |
| 4 | Implant Placement Surgery | After planning/healing | 1 visit |
| 5 | Osseointegration | 3-6 months | 0 visits |
| 6 | Abutment Placement | After integration | 1 visit |
| 7 | Impressions | After gum healing | 1 visit |
| 8 | Crown Delivery | 2-4 weeks after impressions | 1 visit |
| Total | 4-12 months | 5-8+ visits |
Variations in Number of Steps
The traditional sequence described above represents the standard protocol. Several variations alter the number of steps.
Immediate Implant Placement (Same Day as Extraction)
Placing the implant immediately into the extraction socket eliminates the separate extraction appointment and the healing period between extraction and implant placement.
Steps Eliminated: Separate extraction visit; 4-12 week post-extraction waiting period
Total Steps: Reduced by 1-2
Timeline: Reduced by 1-3 months
Immediate placement is possible when the extraction socket is intact, infection is absent, and adequate bone exists beyond the socket apex. This protocol works well for single-rooted front teeth; multi-rooted back teeth are less predictable.
Immediate Loading (Same-Day Teeth)
A temporary crown or bridge is attached to the implant on the same day as placement surgery. The permanent restoration is still delivered after integration, but patients leave with fixed teeth.
Steps Modified: The temporary restoration is delivered at Step 4 instead of waiting until after integration
Additional Appointments During Integration: Possible adjustment visits
Steps Not Eliminated: The permanent restoration (Step 8) still occurs after integration
Immediate loading is more common for full-arch cases (All-on-4) than single teeth. The splinting of multiple implants provides stability during healing that single implants cannot achieve.
Flapless Surgery
In selected cases, implant placement is performed without incising and reflecting gum tissue. A small punch of tissue is removed, and the implant is placed through the opening.
Steps Modified: Step 4 is less invasive; Step 6 may be eliminated if a healing abutment is placed at surgery
Advantages: Reduced surgical time, less post-operative discomfort, faster recovery
Limitations: Only possible when adequate bone volume is confirmed and a surgical guide is used
One-Stage Protocol
The implant is placed with a healing abutment that extends through the gum, eliminating the need for a second surgery to expose the implant.
Steps Eliminated: Step 6 (separate abutment placement surgery)
Total Steps: Reduced by 1
The one-stage approach is now the standard for most implant cases. Two-stage protocols are reserved for situations requiring bone grafting at implant placement or when primary stability is marginal.
Full-Arch Protocols (All-on-4, All-on-6)
Full-arch implant treatment consolidates multiple steps into fewer appointments.
Typical Sequence:
Consultation and planning. Surgery (extractions, implant placement, immediate temporary bridge delivery). Healing and integration (3-6 months). Final impressions and permanent bridge delivery.
Total Steps: 4 major steps instead of 6-8
Total Appointments: 4-6 visits instead of 7-9
The consolidation of steps makes full-arch treatment appear simpler from an appointment perspective, though each step is more extensive than its single-tooth equivalent.
Factors That Add Steps or Extend Treatment Time
Certain clinical situations inevitably extend the implant process.
Bone Grafting Requirements
Inadequate bone volume adds 1-2 surgical steps and 3-9 months to treatment.
Minor grafting at the time of extraction (socket preservation) adds minimal time. Major grafting as a separate procedure requires its own healing period before implant placement can begin. Patients with severe bone loss may require multiple grafting procedures before implant placement.
Sinus Augmentation
Upper posterior implants frequently require sinus lifts, adding one surgical step and 4-9 months of healing.
Treatment of Existing Dental Disease
Cavities, gum disease, and infections must be treated before implant placement. These treatments add steps and extend the pre-implant phase by weeks to months.
Medical Considerations
Patients requiring medical clearance, medication adjustments, or management of chronic conditions may need additional appointments before implant surgery proceeds.
Frequently Asked Questions
How many appointments are needed for a dental implant?
A straightforward single implant typically requires 5-8 appointments over 4-8 months. Complex cases requiring grafting may involve 8-12+ appointments over 9-18 months.
What is the longest step in the implant process?
Osseointegration (Step 5) takes 3-6 months. While this requires no appointments, it is the longest phase and the primary determinant of total treatment time.
Can dental implants be done in one day?
Teeth can be placed on implants in one day, but the permanent restoration is delivered months later. Same-day treatment provides immediate temporary teeth, not a completed permanent case.
Why does the upper jaw take longer to heal than the lower jaw?
Upper jaw bone is less dense than lower jaw bone, requiring longer integration time to achieve adequate implant stability.
Is there any way to speed up the implant process?
Immediate placement, immediate loading, one-stage protocols, and digital workflows all reduce the number of steps or shorten certain phases. However, the osseointegration period cannot be safely shortened below biological minimums.
Do I have to go without a tooth during the implant process?
No. Temporary tooth replacements (flippers, temporary bridges, or temporary implant crowns) provide aesthetics and some function during healing.
How many visits are needed after the crown is delivered?
Annual checkups evaluate implant health. Professional cleanings every 6 months maintain tissue health around the implant. These are routine preventive visits, not additional implant-specific steps.
What happens if a step fails or a complication occurs?
Failed osseointegration requires implant removal, site healing, and replacement implant placement, essentially restarting Steps 4-5. Other complications may add visits for treatment but rarely require restarting the entire process.
Additional Resources
For more information about the dental implant process:
- American Academy of Implant Dentistry: www.aaid.com
- American College of Prosthodontists: www.gotoapro.org
- American Association of Oral and Maxillofacial Surgeons: www.aaoms.org