What Needs to Be Paid Attention to in Dental Implants
You have decided to move forward with dental implants. The consultation is scheduled, or perhaps you are still researching before taking that step. Either way, you understand that this is not a simple filling or crown. Dental implant treatment involves surgery, significant investment, and a commitment that extends for the rest of your life. The decisions you make now, before treatment begins, will affect the outcome for decades. Knowing what matters, what questions to ask, and what to watch for at each stage of the process empowers you to participate actively in your care rather than passively receiving treatment. This guide identifies the critical attention points throughout the dental implant journey, from selecting your provider to maintaining your restoration years after placement.
Before You Begin: The Decision Phase
The period before any implant surgery is when the most important decisions are made. Rushing into treatment without adequate preparation invites problems that could have been avoided.
Choosing the Right Implant Provider
The single most important decision you will make is who places and restores your implant. The skill and experience of your clinical team influence outcomes more than any other variable, including the implant brand, the crown material, or the specific technique used.
Ask about training and experience directly. How many implants does the clinician place annually? What additional training have they completed beyond dental school? Do they manage complications themselves or refer them to other providers? A clinician who places hundreds of implants per year and manages their own complications has a depth of experience that occasional implant placers cannot match.
Board certification indicates advanced training and examination beyond the minimum requirements for licensure. Oral and maxillofacial surgeons, periodontists, and prosthodontists complete years of additional residency training focused on implant surgery or restoration. General dentists who have obtained fellowship credentials from implant organizations have pursued additional training, though not to the extent of surgical specialists.
Evaluate the team approach. Complex implant cases often benefit from collaboration between a surgical specialist who places the implant and a restorative dentist who designs and delivers the crown. Each focuses on their area of expertise. Ask whether your treatment will involve a team and how communication between providers is managed.
Request to see before and after photographs of similar cases the provider has treated. Every clinician should be able to show you their own work. Pay attention to the esthetic outcomes, particularly for anterior cases, and to the tissue health around the implant restorations.
Trust your interpersonal assessment. You will be interacting with this provider and their team over many months. You should feel comfortable asking questions, expressing concerns, and receiving clear, respectful answers. A provider who dismisses your questions or rushes through consultations may not provide the communication you need during complex treatment.
Understanding Your Personal Risk Profile
Not every patient is an equally good candidate for dental implants. Understanding your personal risk factors allows you to address modifiable factors before surgery and make informed decisions about proceeding.
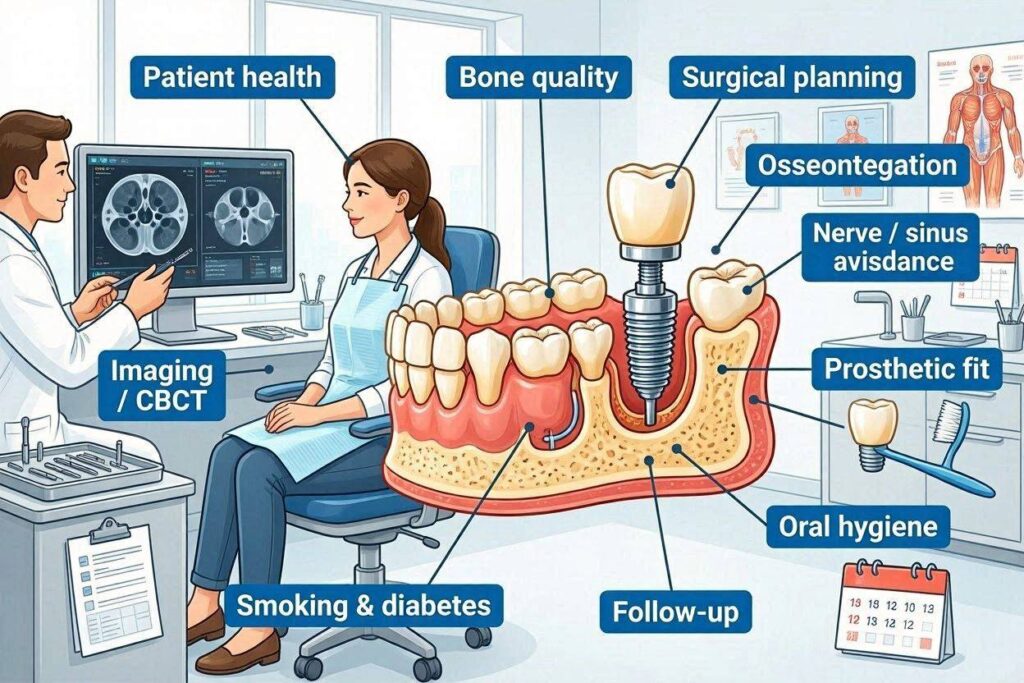
Smoking is the most significant modifiable risk factor for implant failure and complications. If you smoke, your implant failure risk is two to three times higher than a non-smoker. Quitting before implant placement and remaining smoke-free through the healing period dramatically improves your outcomes. Some surgeons will not place implants in active smokers due to the elevated risk.
Uncontrolled diabetes impairs healing and increases infection risk. If you have diabetes, work with your physician to optimize your blood sugar control before implant surgery. Hemoglobin A1c levels below 7 percent are associated with implant success rates approaching those of non-diabetic patients.
A history of periodontitis increases your risk for peri-implantitis. The same susceptibility that led to your natural tooth loss can affect your implants. If you have active periodontal disease, it must be treated and stabilized before implant placement. You will need meticulous ongoing maintenance to protect your implants.
Medications affect implant treatment. Bisphosphonates and other antiresorptive medications used for osteoporosis treatment increase the risk of medication-related osteonecrosis of the jaw. Anticoagulants and antiplatelet medications affect surgical bleeding risk. Provide a complete medication list at your consultation, including over-the-counter supplements.
Bruxism, clenching, or grinding subjects implants to excessive forces that can cause mechanical complications or bone loss. If you have these habits, your implant treatment plan should include protective measures such as a night guard and careful occlusal design.
Obtaining Adequate Diagnostic Information
Implant treatment requires detailed information about your jaw anatomy that cannot be obtained through visual examination alone. Inadequate imaging leads to surprises during surgery and complications that could have been avoided.
Cone beam computed tomography, or CBCT, is the standard of care for implant planning. This three-dimensional imaging reveals your bone height, width, and density. It maps the location of nerves, sinuses, and blood vessels that must be avoided during surgery. It allows virtual implant placement to test different positions and sizes before the actual procedure.
If your provider plans implant placement using only a two-dimensional panoramic radiograph, ask why CBCT imaging is not being used. While panoramic images provide useful screening information, they do not show bone width, do not provide accurate measurements due to magnification, and do not allow three-dimensional planning.
Study models and photographs document your current occlusion and esthetic situation. For anterior implants, a diagnostic wax-up on a model shows the planned tooth shape and position. This wax-up can be used to create a surgical guide that ensures the implant is placed in the ideal position for the planned restoration.
Realistic Cost Assessment
The financial aspect of implant treatment requires attention before you begin. Understanding the total cost, not just the surgical fee, prevents difficult financial situations mid-treatment.
Request a comprehensive treatment plan that includes every anticipated procedure and cost. This plan should include the consultation and imaging, any necessary extractions, bone grafting if needed, the implant placement surgery, the abutment, the implant crown, temporary restorations, and follow-up care.
Understand what your dental insurance covers and what it does not. Obtain a pre-treatment estimate from your insurance carrier before committing to treatment. This document shows exactly what the plan will pay and what your out-of-pocket responsibility will be.
Discuss payment options and financing before treatment begins. Many practices offer payment plans or work with healthcare financing companies. Understanding your financial options reduces stress and allows you to focus on healing rather than bills.
Ask about warranty and guarantee policies. What happens if the implant fails? What costs will you bear, and what will the practice cover? Understanding this before treatment prevents conflict and financial surprise if complications occur.
Preparing for Surgery
The period between deciding to proceed and the actual surgery date is not passive waiting. Actions during this period can significantly influence your surgical experience and healing.
Medical Preparation
Your surgeon will provide specific pre-operative instructions based on your medical history and the planned procedure. Following these instructions carefully is not optional. It directly affects your safety and the procedure’s success.
If you have been prescribed preoperative antibiotics, take them exactly as directed, at the specified time before surgery. These antibiotics reduce the bacterial load in your mouth and bloodstream, decreasing infection risk.
If you are having intravenous sedation or general anesthesia, you will receive specific fasting instructions. Typically, you must not eat or drink anything for six to eight hours before the procedure. Violating these instructions may require rescheduling your surgery for safety reasons.
Arrange for an escort if you are receiving sedation. You will not be able to drive yourself home. Your escort should stay at the office during your procedure or be available by phone to pick you up when you are ready for discharge.
Wear comfortable, loose-fitting clothing. Avoid makeup, contact lenses, and jewelry. These practical considerations make the surgical experience more comfortable and reduce potential complications.
Lifestyle Adjustments
The weeks before surgery are an opportunity to optimize your body’s healing capacity. Good nutrition supports tissue repair and immune function. If your diet has been poor, improving it before surgery provides your body with the building blocks it needs for healing.
If you smoke, the period before surgery is the most critical time to quit. Even a few weeks of smoking cessation improves tissue oxygenation and healing capacity. Your surgeon may test for nicotine or cotinine before surgery. Some surgeons will cancel the procedure if you have smoked recently due to the dramatically increased complication risk.
Alcohol consumption should be reduced or eliminated in the days before surgery. Alcohol can interact with anesthesia medications and impair healing. Discuss your alcohol use honestly with your surgeon.
Arrange time off work realistically. Most patients need one to three days off after single implant placement, longer for multiple implants or complex procedures. If your work involves physical labor, you may need additional time. Plan for this before surgery so you are not stressed about returning to work prematurely.
Practical Preparations
Prepare your recovery environment before surgery. Stock your kitchen with soft foods that you can eat without chewing: yogurt, smoothie ingredients, soup, scrambled eggs, mashed potatoes, protein shakes. Having these on hand eliminates the need to shop while you are recovering.
Fill your prescriptions before surgery so they are available when you need them. You do not want to be waiting at a pharmacy while the local anesthetic wears off and pain develops. Have your pain medication, antibiotics if prescribed, and any other recommended supplies ready.
Arrange ice packs. You will apply ice to your cheek in cycles of 20 minutes on and 20 minutes off for the first 48 hours after surgery. Having multiple ice packs allows you to rotate them so one is always cold.
Clear your schedule for the first 48 to 72 hours after surgery. Do not plan important meetings, social events, or demanding activities. Your body needs rest to heal effectively. Pushing yourself too hard too soon increases swelling, prolongs discomfort, and may compromise healing.
During the Surgical Phase
The day of surgery involves more than simply showing up. Attention to specific aspects of the surgical experience affects your comfort and safety.
Communication with Your Surgical Team
Before the procedure begins, you should have an opportunity to ask any final questions. The surgeon should review the plan with you, confirming which teeth or sites are being treated and what procedures will be performed. This is your last chance to clarify anything you do not understand.
Inform the surgical team of any changes in your health since the consultation. A new medication, a recent illness, or any change in your medical status could affect the procedure. Even seemingly minor changes should be communicated.
Discuss your anxiety level honestly. If you are nervous, the team can adjust their approach to help you feel more comfortable. Options including nitrous oxide, oral sedation, or intravenous sedation can be discussed. There is no reason to suffer through surgery in a state of extreme anxiety.
Understanding Anesthesia Options
The type of anesthesia used affects your experience during and after surgery. Your choice should be based on the procedure complexity, your anxiety level, and your medical history.
Local anesthesia alone numbs the surgical site while you remain fully alert. You will feel pressure and movement but no sharp pain. This works well for straightforward single implant placement in cooperative patients with low anxiety.
Nitrous oxide, or laughing gas, adds relaxation to local anesthesia. You breathe it through a nasal mask during the procedure, and its effects dissipate within minutes after the mask is removed. You can drive yourself home after nitrous oxide.
Oral conscious sedation involves taking a prescribed sedative pill before surgery. You remain conscious but deeply relaxed, and many patients remember little of the procedure. You need an escort to drive you home, as the medication impairs your coordination and judgment for several hours.
Intravenous sedation provides deeper sedation through medication delivered directly into your bloodstream. You drift in and out of consciousness but can respond to commands. This is appropriate for longer procedures, multiple implants, or significant anxiety. You need an escort and should not drive or make important decisions for 24 hours.
What to Expect During the Procedure
Understanding what will happen during surgery reduces anxiety. The surgical team will prepare you with sterile drapes and may ask you to rinse with an antiseptic mouthwash. The anesthesia will be administered and allowed to take full effect before the procedure begins.
You will hear sounds during the procedure including the surgical drill, suction, and conversation among the surgical team. You may feel vibration from the drill and pressure as the implant is placed. You should not feel sharp pain. If you do, inform the surgeon immediately so additional anesthesia can be administered.
The procedure duration depends on the number of implants and the complexity. A single implant typically takes 30 to 60 minutes of surgical time. Multiple implants take proportionally longer. The entire office visit, including preparation and recovery, spans two to three hours for a single implant.
The Critical Healing Period
The weeks and months after implant placement are when your body does the work of integrating the implant into your jawbone. Your behavior during this period directly affects whether osseointegration succeeds or fails.
Immediate Post-Operative Care
The first 24 to 48 hours after surgery are the most critical for protecting the surgical site and establishing good healing. Follow your surgeon’s instructions precisely, even when they seem overly cautious.
Bleeding control involves biting on gauze with firm pressure for 30 to 60 minutes after surgery. Replace gauze as directed if bleeding continues. Pink-tinged saliva is normal. Bright red bleeding that fills the mouth is not and requires immediate attention.
Swelling management uses ice packs on the cheek in cycles of 20 minutes on and 20 minutes off. Continue this for the first 48 hours. After 48 hours, switch to warm compresses if swelling persists. Swelling typically peaks at 48 to 72 hours and then gradually subsides.
Pain management is most effective when medication is taken before the local anesthetic completely wears off. Stay ahead of the pain rather than chasing it. Take prescribed medications exactly as directed. Do not operate vehicles or machinery while taking narcotic pain medication.
Dietary restrictions during the first week protect the surgical site. Consume only soft, cool or room-temperature foods. Avoid hot foods and beverages, which increase bleeding. Avoid chewing on the surgical side entirely. Do not use straws, as the suction can dislodge the blood clot.
Oral Hygiene During Healing
Maintaining cleanliness while protecting the surgical site requires a modified approach to oral hygiene during the healing period.
Do not rinse your mouth for the first 24 hours after surgery. After 24 hours, begin gentle warm salt water rinses after meals and before bed. Mix half a teaspoon of salt in eight ounces of warm water. Gently swish and allow the water to fall from your mouth rather than spitting forcefully.
Brush your other teeth normally with a soft toothbrush, avoiding the surgical site. Keep your mouth as clean as possible to reduce the overall bacterial load that could threaten the healing wound.
If your surgeon has prescribed chlorhexidine mouth rinse, use it as directed, typically twice daily after the first 24 hours. Do not eat or drink for 30 minutes after using chlorhexidine. The rinse may cause temporary staining of teeth and tongue, which can be removed at your next professional cleaning.
After the first week, your surgeon may allow you to begin gentle brushing of the surgical area with a soft toothbrush. Follow your specific instructions, as protocols vary based on the procedure performed and your healing progress.
Activity Restrictions
Physical activity increases blood pressure and can promote bleeding and swelling. Rest for the first 24 to 48 hours after surgery, keeping your head elevated even while sleeping. Use extra pillows to maintain head elevation.
Avoid strenuous exercise, heavy lifting, and activities that increase blood pressure for the period specified by your surgeon, typically three to seven days. Gradual return to normal activity is appropriate after the initial restriction period.
Do not smoke during the healing period. Nicotine constricts blood vessels and reduces oxygen delivery to healing tissues. Smoking during osseointegration dramatically increases implant failure risk. If you cannot quit permanently, at minimum remain smoke-free during the healing period.
Recognizing Complications
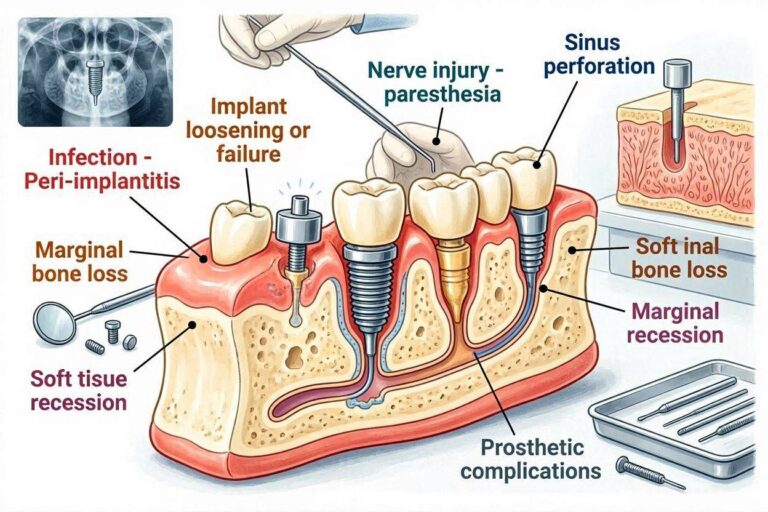
Knowing what normal healing looks like allows you to recognize when something is not right. Normal healing involves swelling that peaks at 48 to 72 hours and then improves, discomfort that decreases daily after the first few days, and gradual return to normal appearance and sensation.
Warning signs that require professional attention include pain that increases after day three or four rather than improving, swelling that continues to increase after day three or becomes hard, hot, or spreading, pus or foul-smelling discharge from the surgical site, and fever or malaise.
Excessive bleeding that does not respond to gauze pressure, numbness that persists beyond 24 hours, and any perception of implant movement are concerning signs that should prompt immediate contact with your surgical office.
Do not wait for a scheduled follow-up appointment if you experience these warning signs. Early intervention for complications produces better outcomes than waiting. Your surgical office should provide emergency contact information for after-hours concerns.
The Restorative Phase
Months after your implant surgery, when osseointegration is complete, the restorative phase begins. This phase transforms the buried implant into a visible, functional tooth.
Soft Tissue Management
The gum tissue around your implant must be healthy and mature before the final crown is fabricated. Rushing into impressions before the tissue is ready compromises the fit and esthetics of the final restoration.
If your implant was placed using a two-stage approach with the implant buried under the gum, a minor uncovering procedure exposes the implant and places a healing abutment. The tissue needs two to four weeks to mature around this abutment before impressions are taken.
During the tissue maturation period, maintain meticulous but gentle oral hygiene around the healing abutment. Use a soft toothbrush and interdental brushes as directed. The tissue should appear pink, firm, and should not bleed when cleaned.
Impression Accuracy
The impression captures the exact position, angulation, and depth of the implant, along with the contour of the surrounding soft tissue. Errors at this stage propagate through the entire restoration, potentially resulting in an ill-fitting crown.
Digital impressions using intraoral scanning have largely replaced traditional impression materials for implant cases. Digital impressions are faster, more comfortable for the patient, and eliminate the dimensional changes that can occur with impression materials.
Whether traditional or digital, the impression must capture the complete implant position including its rotational orientation. The laboratory uses this information to fabricate an abutment and crown that fit precisely and emerge from the gum with a natural contour.
Crown Material Selection
The choice of crown material affects the restoration’s appearance, strength, longevity, and cost. Your restorative dentist should discuss the options and recommend the most appropriate material for your specific situation.
For posterior implants where chewing forces are highest, monolithic zirconia offers maximum strength with acceptable esthetics. For anterior implants where appearance is paramount, lithium disilicate or layered zirconia provides superior translucency and natural appearance.
The material choice also affects the opposing dentition. Zirconia that has been adjusted and not properly polished can be highly abrasive to opposing natural teeth. Lithium disilicate is more wear-friendly. The material should be selected with consideration of what it will bite against.
Occlusal Considerations
The way your implant crown contacts the opposing teeth is critically important. Unlike natural teeth, which have a periodontal ligament that provides shock absorption and sensory feedback, implants are rigidly fixed in bone.
Your implant crown should have lighter occlusal contacts than your natural teeth. When you bite down normally, the implant crown should touch but not bear excessive force. When you clench hard, the natural teeth should take the majority of the force.
The crown should not have premature contacts that cause it to hit before other teeth engage. Premature contacts subject the implant to all the biting force before it is shared with the surrounding teeth. Your dentist will carefully adjust the occlusion using articulating paper to ensure proper force distribution.
If you have bruxism or clenching habits, a night guard is essential to protect your implant and natural teeth from parafunctional forces. The night guard should be evaluated periodically for wear and fit, with replacement when indicated.
Long-Term Maintenance
The implant journey does not end when the crown is delivered. Ongoing maintenance determines whether your implant remains healthy for decades or develops complications that threaten its survival.
Professional Maintenance Schedule
Regular professional maintenance visits are not optional for implant patients. They are essential for early detection of developing problems before they become serious.
The recommended interval for implant maintenance is three to six months, individualized based on your risk factors. Patients with a history of periodontitis, smokers, and those with previous implant complications require more frequent visits. Even low-risk patients should not extend maintenance intervals beyond six months.
The maintenance visit includes evaluation of peri-implant tissue health, including visual inspection, probing depths, and bleeding assessment. Professional cleaning uses non-metal instruments specifically designed for implants to avoid scratching the implant surface. Radiographs are taken at appropriate intervals to monitor bone levels.
Your home care technique is evaluated and reinforced at each visit. Your hygienist can identify areas you are missing and suggest modifications or additional tools to improve your cleaning effectiveness.
Daily Home Care
Effective daily plaque removal is the most important thing you can do to protect your implant. Plaque that accumulates on the implant crown and abutment causes inflammation that, if left untreated, can progress to peri-implantitis with permanent bone loss.
Your toothbrush should have soft bristles to avoid traumatizing the gum tissue around the implant. Electric toothbrushes with pressure sensors prevent excessive force. Brush for two full minutes, twice daily, paying attention to the area where the implant crown meets the gum.
Interdental cleaning is essential because your toothbrush cannot reach between the implant crown and adjacent teeth. Interdental brushes of the appropriate size, water flossers with implant-specific tips, and implant floss or superfloss clean these critical areas. Your dental hygienist can recommend the best tools for your specific implant restoration.
If you have an implant-supported bridge or full-arch prosthesis, specialized cleaning aids including floss threaders, tufted brushes, and rubber-tipped stimulators help clean under the prosthesis where plaque and food debris accumulate. Your dentist or hygienist should provide specific instructions for your prosthesis.
Lifestyle Factors
Smoking continues to threaten implant health long after the implant has integrated. Smokers have higher rates of peri-implantitis and implant failure throughout the implant’s lifetime. Quitting at any point improves your implant’s long-term prognosis.
Dietary choices affect oral health including implant health. A diet high in refined carbohydrates and sugar promotes plaque formation and inflammation. A balanced diet with adequate protein, vitamins, and minerals supports tissue health and immune function.
Overall health management affects implant health. Chronic diseases including diabetes should be well-controlled. New medications should be discussed with your dentist, as some can affect oral tissues and implant maintenance.
Monitoring for Changes
Between professional visits, you are the first line of defense for detecting problems. Know what to look for and what warrants a call to your dentist.
Bleeding when you brush or floss around the implant is not normal. Occasional bleeding after a lapse in cleaning may indicate reversible mucositis that will resolve with improved hygiene. Persistent bleeding despite good cleaning warrants professional evaluation.
Changes in the appearance of the gum around the implant, including redness, swelling, or recession, should be evaluated. The implant crown appearing longer than it did previously indicates gum and possibly bone recession.
Any perception of movement, clicking, or change in the feel of the implant when biting should be reported promptly. These symptoms may indicate a loose abutment screw, which is easily treated, or more serious problems requiring intervention.
Pain, discomfort, or a bad taste associated with the implant should never be ignored. These symptoms indicate inflammation or infection that requires professional diagnosis and treatment.
Special Considerations for Different Implant Types
Different implant restorations have different maintenance requirements and potential complications. Understanding the specifics of your restoration helps you care for it properly.
Single Implant Crowns
A single implant-supported crown is the most straightforward implant restoration to maintain. Interdental brushes clean between the implant crown and adjacent teeth. Floss or superfloss cleans the area where the crown meets the gum.
The most common long-term complication of single implant crowns is peri-implantitis, driven by plaque accumulation at the crown margin. Meticulous oral hygiene and regular professional maintenance prevent this complication.
Screw-retained single crowns have an access hole on the biting surface or back surface that is filled with composite resin. This filling may wear or discolor over time and can be replaced at a maintenance visit.
Implant-Supported Bridges
Implant-supported bridges replace multiple missing teeth using two or more implants as supports. The bridge spans the edentulous space, with the artificial teeth suspended between the implant-supported retainers.
Cleaning under an implant bridge requires specialized aids. Floss threaders pass cleaning floss under the bridge. Water flossers with specialized tips flush debris from under the pontics, the artificial teeth suspended between implants. Interdental brushes clean around the implant abutments.
The area under the bridge must be cleaned daily. Food debris and plaque accumulate under the pontics, causing inflammation of the underlying tissue and potentially contributing to peri-implant disease around the supporting implants.
Full-Arch Implant Prostheses
Full-arch prostheses, including All-on-4 and similar designs, replace all teeth on an arch using four to six implants. These prostheses may be fixed, removed only by the dentist, or removable by the patient for cleaning.
Fixed full-arch prostheses require meticulous daily cleaning with water flossers, interdental brushes, and specialized aids to access all surfaces. Professional maintenance includes removal of the prosthesis for thorough cleaning and evaluation of the supporting implants.
Removable full-arch prostheses, or overdentures, should be removed daily for cleaning. The prosthesis is brushed with a denture brush and soaked in denture cleaner. The supporting implants and the tissue under the prosthesis are cleaned. The prosthesis should not be worn during sleep.
Zirconia vs. Titanium Implants
The implant material affects long-term maintenance considerations. Zirconia implants are white or tooth-colored, which may be esthetically advantageous in patients with thin gum tissue. The surface properties of zirconia may accumulate less plaque than titanium, though this difference is less significant with proper oral hygiene.
Zirconia implants cannot be detected by metal detectors and do not conduct electricity, which some patients prefer. However, zirconia implants have a shorter clinical track record than titanium, and long-term data beyond fifteen years is still being accumulated.
The maintenance principles are the same regardless of implant material. Effective plaque removal, regular professional evaluation, and prompt attention to warning signs protect both titanium and zirconia implants.
Conclusion
Successful dental implant treatment requires attention at every phase: selecting an experienced provider with appropriate training, understanding and addressing personal risk factors before surgery, following pre-operative and post-operative instructions meticulously, protecting the implant during the critical healing period, ensuring precise restorative procedures with appropriate material selection and occlusal management, and committing to lifelong maintenance including effective daily home care and regular professional evaluation. The patient’s role in implant success extends from the initial decision-making through decades of maintenance, making informed participation in treatment essential rather than passive receipt of care. The investment of time, effort, and attention throughout the implant journey protects the significant financial investment and delivers the decades of function and confidence that well-maintained dental implants can provide.
Frequently Asked Questions
What is the most important factor for implant success?
The skill and experience of the clinical team is the most important factor, assuming the patient is a reasonable candidate. A skilled surgeon and restorative dentist working together produce better outcomes than the specific implant brand or crown material used. Choose your provider based on training, experience, and demonstrated results.
How can I tell if I am a good candidate for implants?
Adequate bone volume, good oral and general health, and commitment to oral hygiene and maintenance are the key criteria. A thorough evaluation including CBCT imaging determines your candidacy. Many patients who initially lack adequate bone can become candidates through grafting procedures.
What should I avoid after implant surgery?
Avoid smoking, alcohol, strenuous exercise, hot foods and beverages, drinking through straws, spitting forcefully, and chewing on the surgical side. Follow your surgeon’s specific post-operative instructions, which may include additional restrictions based on your procedure.
How do I clean my implant properly?
Brush twice daily with a soft toothbrush, paying attention to the area where the crown meets the gum. Clean between the implant crown and adjacent teeth using interdental brushes, water flossers, or implant-specific floss. Attend professional maintenance visits every three to six months.
When can I eat normally after implant placement?
Soft foods are recommended for the first week. Avoid chewing on the implant side for the entire osseointegration period, typically three to six months. After the final crown is placed, you can gradually return to normal chewing, though you should avoid extremely hard foods that could damage the crown.
How do I know if something is wrong with my implant?
Warning signs include bleeding when cleaning, redness or swelling of the gum, recession exposing the implant surface, any perception of movement, clicking when biting, pain or discomfort, and bad taste or odor. Any of these signs warrants professional evaluation.
Do I need to see a specialist for implant maintenance?
Your general dentist or dental hygienist can provide implant maintenance if they have appropriate training and non-metal instruments. Some patients, particularly those with complex prostheses or a history of complications, benefit from periodic evaluation by the surgical or restorative specialist.
How often should I have radiographs of my implant?
Annual radiographs are typical for stable implants. The first post-restoration radiograph establishes a baseline. Subsequent radiographs monitor bone levels for stability. More frequent radiographs may be indicated if complications develop or if you have risk factors for peri-implant disease.
Additional Resource
American College of Prosthodontists: Dental Implant Care
https://www.prosthodontics.org/about-acp/patient-education-resources/