When Can You Brush Your Teeth After Dental Implant Surgery?
You stand in front of the bathroom mirror, toothbrush in hand, frozen by uncertainty. Your mouth feels like it needs cleaning, but yesterday a surgeon placed a titanium post into your jawbone, and the surgical site is tender, swollen, and crisscrossed with sutures. Your post-operative instructions probably included something about oral hygiene, but the details may have blurred in the haze of anesthesia and post-surgical fatigue. Can you brush today? Should you avoid the surgical site entirely? What about flossing? Using mouthwash? The answers matter more than many patients realize. Proper oral hygiene after implant surgery protects your investment by preventing infection and supporting healing. Improper hygiene can disrupt the surgical site, compromise osseointegration, and lead to implant failure. This guide provides a clear, day-by-day and week-by-week roadmap for oral hygiene after dental implant surgery, eliminating the guesswork and helping you protect your new implant.
Why Oral Hygiene After Implant Surgery Requires Modification
Your normal oral hygiene routine, however effective it may be for your natural teeth, is not appropriate for a mouth that has just undergone implant surgery. Understanding why modifications are necessary helps you follow the recommendations correctly.
The Vulnerability of the Surgical Site
The surgical site after implant placement is a healing wound, not simply a tooth that needs cleaning. The gum tissue has been incised and sutured. The bone has been drilled. A blood clot fills the space around the implant and under the gum tissue. This clot is the foundation of healing, providing the scaffold for new tissue formation and containing the growth factors that initiate the healing cascade.
Aggressive brushing, rinsing, or any mechanical disruption of the surgical site during the first days after surgery can dislodge this blood clot. Loss of the clot exposes the underlying bone and implant to oral fluids and bacteria. Healing is delayed, and the risk of infection and failed osseointegration increases.
The sutures that close the wound are also vulnerable. Brushing over sutures can loosen or break them, causing the wound to open. Sutures must remain intact until the wound has developed sufficient intrinsic strength to stay closed without them, typically seven to fourteen days.
The Risk of Infection
The mouth harbors billions of bacteria. Under normal circumstances, the intact oral mucosa and the immune system keep these bacteria in check. Surgery creates a breach in this barrier, providing a potential entry point for bacteria into the deeper tissues and the implant site.
Maintaining cleanliness of the mouth reduces the bacterial load and the risk of surgical site infection. However, cleaning must be accomplished without disrupting the wound. This requires a modified approach that balances infection prevention with wound protection.
Infection during the healing period can compromise osseointegration. The inflammatory environment created by infection favors fibrous tissue formation over bone formation. An infected implant site may fail to integrate, requiring implant removal and replacement after the infection resolves and the site heals.
The Healing Timeline Dictates the Hygiene Timeline
The appropriate oral hygiene approach changes as healing progresses. What is appropriate on day one is different from what is appropriate on day seven, which is different from what is appropriate after a month. Understanding the healing timeline and modifying your hygiene accordingly ensures that you protect the surgical site when it is vulnerable and clean it effectively when it can tolerate cleaning.
The healing timeline can be divided into distinct phases, each with specific oral hygiene recommendations. Following this timeline, rather than guessing or reverting prematurely to your normal routine, protects your implant during its most vulnerable period.
The First 24 Hours: Complete Protection
The first 24 hours after implant surgery are the most critical for protecting the surgical site. During this period, the blood clot is forming and stabilizing, and any disruption can have significant consequences.
No Brushing, No Rinsing, No Spitting
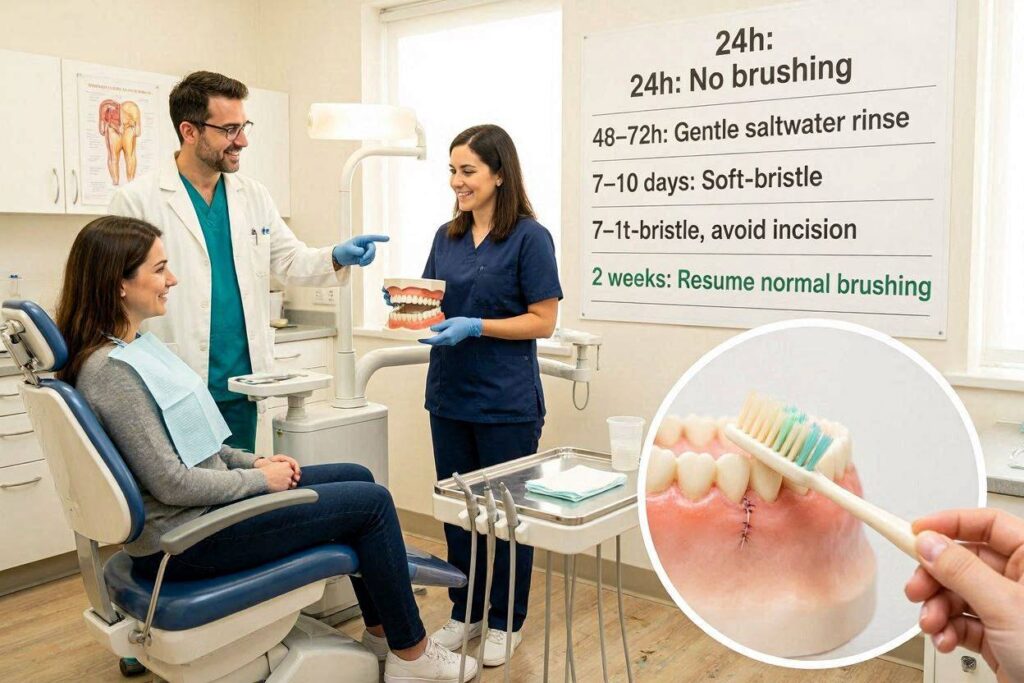
For the first 24 hours, you should not brush your teeth at all, even the teeth far from the surgical site. The mechanical action of brushing, the toothpaste, and the need to spit can all disrupt the forming blood clot. The risk of disturbing the surgical site outweighs the benefit of cleaning your teeth for this single day.
You should not rinse your mouth with anything during the first 24 hours, including water, salt water, or mouthwash. Rinsing can dislodge the blood clot. Spitting forcefully is particularly dangerous, as the pressure changes in the mouth can suction the clot from the socket.
If you feel the need to freshen your mouth, you can gently wipe your tongue with a moist gauze pad, being careful to avoid the surgical site. This provides some feeling of cleanliness without endangering the healing wound.
Managing Bleeding and the Surgical Site
Bleeding is normal during the first 24 hours. Pink-tinged saliva is expected. The gauze placed by your surgeon should be bitten on with firm pressure for 30 to 60 minutes after leaving the office. Replace gauze as directed if bleeding continues.
Do not disturb the surgical site with your tongue, fingers, or any object. The temptation to explore the area with your tongue can be strong, particularly as the local anesthetic wears off and the area feels strange. Consciously avoid this. Your tongue can disrupt the blood clot just as effectively as a toothbrush.
If bleeding is significant, bite on a moistened tea bag wrapped in gauze for 30 minutes. The tannic acid in tea promotes clotting. If bleeding is bright red and heavy, or does not respond to pressure, contact your surgical office.
Managing the Rest of Your Mouth
While you cannot brush, you can take some measures to maintain comfort and cleanliness. Drink plenty of cool water, sipped from a glass without a straw. Water helps clear food debris and bacteria from the mouth without mechanical disruption.
If you were prescribed an antibiotic mouth rinse, do not use it during the first 24 hours unless your surgeon has specifically instructed otherwise. The standard protocol is to begin antimicrobial rinses after the first 24 hours.
Days Two Through Seven: Modified Oral Hygiene Begins
After the first 24 hours, the blood clot has stabilized sufficiently to begin a modified oral hygiene routine. This routine protects the surgical site while beginning to clean the rest of the mouth.
Warm Salt Water Rinses
Beginning 24 hours after surgery, you can start gentle warm salt water rinses. Mix half a teaspoon of table salt in eight ounces of warm water. The water should be warm, not hot. Hot water can increase bleeding.
Rinse gently. Take a mouthful of the salt water and gently move your head from side to side, allowing the water to bathe the surgical site without forceful swishing. Then allow the water to fall from your mouth into the sink. Do not spit forcefully. The goal is to clean the area without creating pressure changes that could disrupt the healing clot.
Repeat the salt water rinse after every meal or snack and before bed. Aim for four to six rinses daily. The salt water helps keep the surgical site clean, reduces bacterial levels, and can be soothing to the healing tissues.
Prescription Mouth Rinse Use
If your surgeon prescribed chlorhexidine gluconate mouth rinse, begin using it 24 hours after surgery as directed. The typical protocol is twice daily, morning and evening, after completing your oral hygiene routine.
Chlorhexidine is a potent antimicrobial that significantly reduces oral bacterial levels. It is particularly effective at preventing surgical site infection. Use it exactly as prescribed. Do not rinse with water after using chlorhexidine, as this dilutes the medication. Do not eat or drink for 30 minutes after rinsing.
Chlorhexidine can cause temporary staining of teeth, tongue, and dental restorations. This staining is not permanent and can be removed at your next professional cleaning. It can also temporarily alter taste sensation. These side effects are acceptable trade-offs for the infection prevention benefits during the critical healing period.
Brushing the Non-Surgical Teeth
You can and should brush the teeth not involved in the surgical site. Use a soft-bristled toothbrush. A toothbrush with a small head allows more precise cleaning and easier avoidance of the surgical area.
Brush gently and deliberately. Do not use an electric toothbrush during the first week, as the mechanical action is more difficult to control around the surgical site. Manual brushing with a soft brush allows you to feel exactly where the brush is and avoid the wound.
Brush for the normal two minutes, focusing on the teeth away from the surgical site. Use a small amount of non-abrasive toothpaste. Avoid whitening toothpastes and those with harsh abrasives during the healing period.
When you need to spit, do so gently. Allow the toothpaste and saliva to fall from your mouth rather than spitting forcefully. Rinse your mouth gently with water afterward, again allowing the water to fall rather than spitting.
The Surgical Site Remains Off-Limits
Do not brush the surgical site itself during the first week. The gum tissue over the implant, the sutures, and the surrounding area should not be touched by your toothbrush. The healing wound cannot tolerate mechanical cleaning during this period.
If a healing abutment is protruding through the gum, do not brush it during the first week. The tissue around the abutment is healing and is vulnerable to disruption. The salt water rinses and chlorhexidine will keep the area adequately clean during this period.
After the first week, your surgeon may instruct you to begin gentle cleaning around the healing abutment. Follow your specific instructions. If you have not received instructions, ask at your follow-up appointment.
Flossing During the First Week
Do not floss the teeth adjacent to the surgical site during the first week. Flossing can catch on the sutures or disturb the wound edges. The adjacent teeth may have been affected by the surgery, and their supporting tissues may be tender or compromised.
You can floss teeth that are well away from the surgical site. Be gentle and deliberate. Avoid any flossing maneuver that could accidentally involve the surgical area.
Weeks Two Through Four: Gradual Return to Oral Hygiene
By the second week, the soft tissue has healed substantially. Sutures have dissolved or been removed. The wound is no longer open. Oral hygiene can begin to return toward normal, though some modifications remain.
Introducing Gentle Brushing of the Surgical Site
After the first week, and with your surgeon’s approval, you can begin gentle brushing of the surgical area. Use a soft toothbrush, preferably one with a small head for precision.
Brush the healing abutment, if present, with gentle circular motions. The goal is to remove plaque from the abutment surface without traumatizing the healing tissue around it. The tissue may still be tender. Bleeding during brushing at this stage can be normal as the tissue is still maturing, but heavy bleeding or pain indicates that you are brushing too aggressively.
If the implant was placed with a two-stage approach and is buried under the gum, brush the gum surface over the implant gently. The tissue has healed closed, but it is still maturing and should be treated gently.
Use a non-abrasive toothpaste. Avoid toothpaste with baking soda, whitening agents, or harsh abrasives that could scratch the healing abutment or irritate the healing tissue.
Resuming Flossing With Caution
You can resume flossing the teeth adjacent to the surgical site, but do so carefully. The gum tissue between the adjacent tooth and the implant site may be more sensitive and vulnerable than tissue elsewhere.
Use a gentle sawing motion to pass the floss between the teeth. Do not snap the floss through the contact, as this can traumatize the tissue. Curve the floss around the tooth surface and clean gently. Avoid traumatizing the tissue on the implant side of the adjacent tooth.
If you have a healing abutment in place, you do not need to floss around it during this period. The abutment is circular, and floss is not designed for this shape. Interdental brushes, when introduced later, will clean around the abutment more effectively.
Interdental Cleaning Around Healing Abutments
Once the tissue around the healing abutment has matured, typically by week three or four, you can introduce interdental brushes for cleaning around the abutment. Your dental hygienist can recommend the appropriate brush size.
An interdental brush should fit through the space between the healing abutment and the adjacent tooth with slight resistance. The brush should clean the abutment surface without traumatizing the tissue. Use gentle back-and-forth motions. Rinse the brush frequently during use.
Water flossers on a low setting can be introduced around this time if your surgeon approves. The pulsating water cleans around the abutment effectively without mechanical contact. Use the lowest pressure setting initially and increase gradually as the tissue matures.
Continuing Antimicrobial Rinses
If you were prescribed chlorhexidine, continue using it as directed through the prescribed course, typically two weeks. Do not extend use beyond the prescribed period without your surgeon’s approval, as prolonged chlorhexidine use has side effects including staining and altered taste.
After the chlorhexidine course is complete, you can use an alcohol-free antimicrobial mouthwash or continue with warm salt water rinses. Avoid alcohol-based mouthwashes, which can irritate the healing tissue and cause dryness.
Beyond One Month: Normal Hygiene With Implant Considerations
By one month after surgery, the soft tissue is mature and can tolerate normal oral hygiene. However, the implant requires specific cleaning techniques that differ from those used for natural teeth.
Brushing Around the Final Crown
If your final crown has been placed, brush it as you would your natural teeth, with attention to the area where the crown meets the gum. This junction is where plaque accumulates and where peri-implant disease begins.
Use a soft-bristled toothbrush. Medium or hard bristles can traumatize the gum tissue around the implant. Electric toothbrushes with pressure sensors are excellent for implant care, as they prevent excessive force.
Angle the brush at 45 degrees to the gum line, allowing the bristles to reach slightly into the sulcus between the crown and the gum. Use small circular motions. Brush for a full two minutes, covering all surfaces of the implant crown and all natural teeth.
Interdental Cleaning for Implant Restorations
Interdental cleaning is essential for implant health. The spaces between the implant crown and adjacent teeth are where plaque accumulates and where peri-implant disease often begins.
Interdental brushes of the appropriate size clean the mesial and distal surfaces of the implant crown effectively. The brush should fit the space comfortably. Use gentle back-and-forth motions, cleaning both the crown surface and the adjacent tooth surface.
Implant-specific floss, which is wider and more textured than standard floss, can be used to clean the abutment surface below the crown. Floss threaders help pass the floss under implant-supported bridges.
Water flossers with specialized implant tips deliver antimicrobial solution into the sulcus around the implant. Use a medium to low pressure setting. Direct the stream at the junction of the crown and gum, moving around the entire circumference of the implant.
Professional Maintenance Schedule
Professional maintenance visits should occur every three to six months after implant placement, individualized based on your risk factors. These visits are essential for implant health and should not be skipped.
The dental hygienist uses non-metal instruments specifically designed for implant cleaning. These instruments, made of plastic, graphite, or titanium, clean the implant surface without scratching it. Metal instruments designed for natural teeth can scratch the implant abutment and crown, creating surfaces that accumulate more plaque.
Radiographs are taken at appropriate intervals, typically annually, to monitor bone levels around the implant. Stable bone levels over time indicate a healthy implant. Progressive bone loss requires investigation and intervention.
Special Situations and Their Hygiene Requirements
Not all implant surgeries are identical. Different procedures have different hygiene requirements during the healing period.
Immediate Implant Placement
When an implant is placed into a fresh extraction socket immediately after tooth removal, the surgical site combines an extraction wound with an implant placement wound. The oral hygiene requirements are similar to standard implant placement, with particular attention to protecting the extraction socket.
The socket may be larger and the clot more vulnerable than in standard implant placement. Strict adherence to the no-brushing, no-rinsing policy for the first 24 hours is essential. Gentle salt water rinses begin after 24 hours. The socket edges may be visible and should be treated as part of the surgical site.
Implants With Simultaneous Bone Grafting
When bone grafting is performed at the same time as implant placement, wound closure and protection of the graft material are critical. The oral hygiene modifications may extend longer than for implant placement alone.
Sutures are typically retained for two to three weeks to ensure adequate soft tissue closure over the graft. The surgical site should be protected from brushing for the period specified by your surgeon, which may be longer than the standard one week.
Particulate graft materials can be lost through the wound if it opens. Gentle oral hygiene, avoidance of any trauma to the surgical site, and careful adherence to dietary restrictions protect the graft during the healing period.
Sinus Lift Procedures
Sinus lift surgery creates additional oral hygiene considerations beyond implant placement. The sinus membrane has been elevated, and the sinus cavity is healing. Pressure changes in the sinus can disrupt healing.
In addition to standard implant site precautions, patients with sinus lifts must avoid activities that create pressure changes. Do not blow your nose for at least two weeks. If you must sneeze, do so with your mouth open to equalize pressure. Do not use straws. Do not smoke.
Nasal hygiene may be affected. Your surgeon may prescribe nasal sprays or decongestants. Follow these instructions carefully. The sinus precautions are in addition to, not instead of, the oral hygiene modifications.
Full-Arch Implant Restorations
Full-arch implant restorations, such as All-on-4 prostheses, present unique cleaning challenges. The prosthesis covers multiple implants and contacts the gum tissue over a large area. Food debris and plaque accumulate under the prosthesis.
During the initial healing period after implant placement, oral hygiene follows the standard post-surgical protocol. Once the provisional prosthesis is placed, specialized cleaning aids become necessary.
Water flossers with specialized tips clean under the prosthesis effectively. Interdental brushes clean between the implant abutments. Superfloss or floss threaders pass under the prosthesis to clean the tissue surface. Your dentist or hygienist should provide specific instructions and demonstrate the appropriate technique for your prosthesis.
Signs You Are Brushing Too Aggressively
Even with the best intentions, patients can traumatize the healing or healed tissues around implants through overly aggressive oral hygiene.
Recession and Tissue Damage
Gum recession around implants can result from overly aggressive brushing. Unlike natural teeth, which have a periodontal ligament and can tolerate some brushing abrasion, the tissue around implants is more vulnerable to mechanical trauma.
If the gum around your implant appears to be receding, exposing more of the crown or abutment than before, your brushing technique may be contributing. Use a softer brush, reduce pressure, and switch to an electric toothbrush with a pressure sensor if you have difficulty controlling manual brushing force.
Tissue that appears traumatized, with a red, raw, or ulcerated appearance, may be suffering from overbrushing. The tissue should be pink and firm. Inflamed, painful tissue that is not explained by plaque accumulation may indicate mechanical trauma.
Bleeding That Does Not Resolve
Bleeding when brushing around implants is a sign of inflammation. This inflammation may result from inadequate plaque removal, in which case improved hygiene is the solution. It may also result from overly aggressive brushing that is traumatizing the tissue.
If you have improved your brushing technique and are cleaning effectively, yet bleeding persists, you may be brushing too hard. Reduce pressure, use a softer brush, and focus on technique rather than force. Bleeding should resolve within a week or two of appropriate hygiene.
Persistent bleeding despite gentle, effective cleaning warrants professional evaluation. It may indicate peri-implant mucositis or peri-implantitis that requires professional treatment beyond what home care can provide.
Conclusion
After dental implant surgery, complete protection of the surgical site with no brushing, rinsing, or spitting is required for the first 24 hours to allow the blood clot to stabilize without disruption. Beginning 24 hours post-operatively, gentle warm salt water rinses can commence along with careful brushing of the non-surgical teeth using a soft manual toothbrush, while the surgical site itself remains completely off-limits to mechanical cleaning for at least the first week. By the second week, with surgeon approval, gentle brushing of the healing abutment or the healed gum over the implant can begin, with gradual reintroduction of flossing and interdental cleaning over weeks two through four as the soft tissue matures. Once the final crown is placed and the tissues are fully healed, normal oral hygiene resumes with the addition of implant-specific cleaning aids including interdental brushes, implant floss, and water flossers, supported by professional maintenance every three to six months using non-metal instruments designed specifically for implant care.
Frequently Asked Questions
Can I use an electric toothbrush after implant surgery?
Avoid electric toothbrushes for the first week after surgery, as the mechanical action is more difficult to control near the surgical site. After the first week, you can resume using an electric toothbrush on teeth away from the surgical site. After the tissue has healed, electric toothbrushes with pressure sensors are excellent for implant care.
When can I use toothpaste again?
You can use toothpaste on the non-surgical teeth beginning 24 hours after surgery. Use a non-abrasive toothpaste. Avoid whitening toothpaste and those with baking soda or harsh abrasives during the healing period. Do not brush the surgical site itself with toothpaste for the first week.
What if food gets stuck in the surgical site?
During the first 24 hours, do not attempt to remove food from the surgical site. After 24 hours, gentle warm salt water rinses will help flush debris from the area. Do not use toothpicks or sharp instruments. If debris remains after rinsing, contact your surgical office rather than attempting aggressive removal.
Can I use mouthwash after implant surgery?
Do not use any mouthwash during the first 24 hours. After 24 hours, use only the mouthwash prescribed by your surgeon, typically chlorhexidine, or warm salt water. Avoid alcohol-based mouthwashes throughout the healing period. Alcohol-free antimicrobial mouthwashes can be introduced after the prescribed rinse course is complete.
When can I floss normally again?
You can resume gentle flossing of teeth adjacent to the surgical site after the first week, being careful to avoid traumatizing the healing tissue. Normal flossing around the implant crown can begin once the final restoration is placed and the tissue is mature, with implant-specific floss or interdental brushes recommended for optimal cleaning.
How do I clean around a healing abutment?
During the first week, do not brush the healing abutment. The salt water rinses and chlorhexidine will keep it adequately clean. After the first week, you can begin gentle brushing of the healing abutment with a soft toothbrush, using small circular motions. Interdental brushes can be introduced around week three or four.
Why is my gum bleeding when I brush around the implant?
Bleeding indicates inflammation. In the early healing period, some bleeding is normal as the tissue is still maturing. After the tissue has healed, bleeding suggests either inadequate plaque removal or overly aggressive brushing. Improve your cleaning technique and reduce brushing pressure. Persistent bleeding despite appropriate hygiene warrants professional evaluation.
How often should I have my implant professionally cleaned?
Professional maintenance every three to six months is recommended, individualized based on your risk factors. Patients with a history of periodontitis, smokers, and those with previous implant complications require more frequent visits. The cleaning must use non-metal instruments designed for implants to avoid scratching the implant surface.
Additional Resource
American Dental Association: Dental Implant Care and Maintenance
https://www.mouthhealthy.org/all-topics-a-z/dental-implants